Exporting annotations
People often ask about exporting QuPath annotations, to which the response is invariably ‘In which format exactly?’ Historically, the answer to this question has not always been fully satisfying – because it’s hard to find standards that everyone can support.
There are two main ways in which annotations might be exported:
Shapes (vertices)
Primarily useful to transfer annotations between different software applications (e.g. a QuPath ROI to an ImageJ ROI).Images (binary or labeled)
Often used to train AI models (e.g. with TensorFlow, PyTorch).
QuPath supports both kinds of export into different formats by scripting.
Units and origin
All of the shape export methods below define coordinates in pixel units, taking the origin (0, 0) as the top left corner of the full-resolution image within QuPath.
This matches QuPath’s internal representation of ROIs, but may be different from how other software expects the origin and units to be defined.
Shapes
GeoJSON
GeoJSON is an open standard for representing geographical features – but also a handy way to represent shapes of various kinds.
It is also the preferred method of annotation export in QuPath, because it preserves quite a lot of information.
You can export your objects via the command.
Alternatively, the GeoJSON export can be done through scripting. The following script exports a GeoJSON representation of all the annotations in an image to a specific path:
def annotations = getAnnotationObjects()
def path = "path/to/file.geojson"

// 'FEATURE_COLLECTION' is standard GeoJSON format for multiple objects
exportObjectsToGeoJson(annotations, path, "FEATURE_COLLECTION")

// The same method without the 'FEATURE_COLLECTION' parameter outputs a simple JSON object/array
// exportObjectsToGeoJson(annotations, path)
It is worth reading a bit around the GeoJSON specification and comparing with QuPath’s output to see how QuPath attempts to map its objects to valid GeoJSON.
In particular, QuPath provides a FeatureCollection so that additional properties can be included (e.g. classifications).
Tip
This should make it possible to exchange regions with other software, for example to get them into Python via Shapely.
Tip
If you really just want shapes, but not the other annotation properties, you can export ROIs instead of PathObjects.
def rois = getAnnotationObjects().collect {it.getROI()}
def gson = GsonTools.getInstance(true)
println gson.toJson(rois)
Well-structured text
GeoJSON export is helped by the fact that QuPath ROIs can be converted into Java Topology Suite Geometries by simply calling the ROI.getGeometry() method.
JTS also has a writer for Well-known text (WKT). The following script prints the WKT representation for each annotation ROI.
import org.locationtech.jts.io.WKTWriter

def annotations = getAnnotationObjects()
def writer = new WKTWriter()
annotations.each {
  println writer.write(it.getROI().getGeometry())
}
For full details, see the JTS Javadocs.
Well-structured binary
Like WKT, JTS can be used to export ROIs as Well-known binary using org.locationtech.jts.io.WKBWriter.
ImageJ ROIs
QuPath can exchange ROIs with ImageJ. Additionally, ImageJ also has a Roi Manager, which can be used to save/reload ROIs from zip files.
Putting these together, we can have a QuPath script that exports annotations to a zip file that can be opened in ImageJ’s ROI Manager by simply dragging it onto the ImageJ status bar.
import ij.plugin.frame.RoiManager

def path = buildFilePath(PROJECT_BASE_DIR, "rois.zip")

def annotations = getAnnotationObjects()
def roiMan = new RoiManager(false)
double x = 0
double y = 0
double downsample = 1 // Increase if you want to export to work at a lower resolution
annotations.each {
  def roi = IJTools.convertToIJRoi(it.getROI(), x, y, downsample)
  roiMan.addRoi(roi)
}
roiMan.runCommand("Save", path)
A note on XML
A common question regarding QuPath is whether it supports XML annotations.
In practice, this requires a specification (schema) describing exactly the structure of the XML required; different software may use XML in totally different ways.
What I think many people may mean is ‘ImageScope XML’, because this has been around for a long time. QuPath does not support this because there is not (to my knowledge) any public schema describing it; rather, QuPath focusses on well-defined, open formats.
Binary & labeled images
Working with images in QuPath usually involves creating an ImageServer to handle pixels and metadata.
Often these pixels and metadata are read from a file, but some special ImageServers are able to generate them on demand based on something else.
An example of this is a LabeledImageServer, which provides pixels based upon an object hierarchy.
This can be created and customized in various ways, and then used to write out the binary and labeled images corresponding to objects of interest.
Labeled vs. Binary
Labeled images are images where the value of each pixel represents a particular class. Such images are efficient (a lot of information can be squeezed into a single image channel), but limited (each pixel can only have one label).
Binary images are images where each pixel can have one of two values: often 0 and 255 (but sometimes 0 or 1). While a single binary image channel can contain less information than a corresponding labeled image, if we create a multichannel binary image (with each channel representing a class) it may actually contain more – because now each channel can independently provide information for the classification of each pixel.
In practice, means that multichannel binary images allow overlaps to be represented: that is, pixels can be assigned to multiple classes.
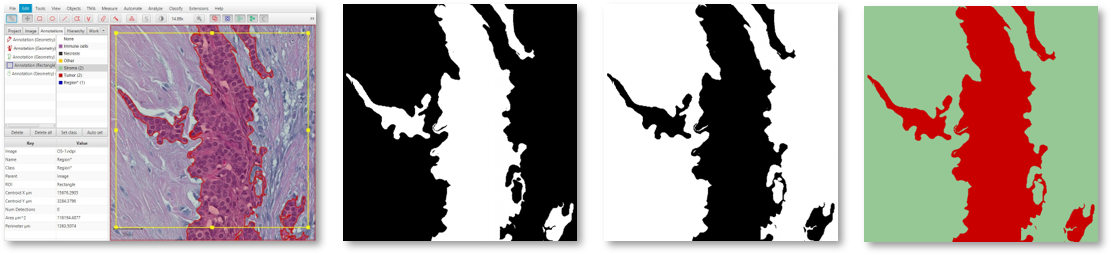
An image in QuPath (left) with annotations exported as two binary image channels (center) or a single labeled image (right).
Individual annotations
The following script creates a LabeledImageServer, and loops through all annotations in an image with the clasifications Tumor, Stroma and Other – exporting a labeled image for the bounding box of each annotation.
Any other annotations occur within the same bounding box will also be included.
import qupath.lib.images.servers.LabeledImageServer

def imageData = getCurrentImageData()

// Define output path (relative to project)
def name = GeneralTools.getNameWithoutExtension(imageData.getServer().getMetadata().getName())
def pathOutput = buildFilePath(PROJECT_BASE_DIR, 'export', name)
mkdirs(pathOutput)

// Define output resolution
double requestedPixelSize = 2.0

// Convert to downsample
double downsample = requestedPixelSize / imageData.getServer().getPixelCalibration().getAveragedPixelSize()

// Create an ImageServer where the pixels are derived from annotations
def labelServer = new LabeledImageServer.Builder(imageData)
    .backgroundLabel(0, ColorTools.WHITE) // Specify background label (usually 0 or 255)
    .downsample(downsample)    // Choose server resolution; this should match the resolution at which tiles are exported
    .addLabel('Tumor', 1)      // Choose output labels (the order matters!)
    .addLabel('Stroma', 2)
    .addLabel('Other', 3)
    .lineThickness(2)          // Optionally export annotation boundaries with another label
    .setBoundaryLabel('Boundary*', 4) // Define annotation boundary label
    .multichannelOutput(false) // If true, each label refers to the channel of a multichannel binary image (required for multiclass probability)
    .build()


// Export each region
int i = 0
for (annotation in getAnnotationObjects()) {
    def region = RegionRequest.createInstance(
        labelServer.getPath(), downsample, annotation.getROI())
    i++
    def outputPath = buildFilePath(pathOutput, 'Region ' + i + '.png')
    writeImageRegion(labelServer, region, outputPath)
}
The builder pattern used to create the LabeledImageServer makes it possible to tune the output.
Not all options need to be provided, in which case defaults will be used.
Of note, the labels provided to the builder correspond to QuPath classifications and the integer value in the output image.
The builder also makes if possible to define the background label for unannotated pixels (here, 0) and even specify that the boundaries of annotations are assigned a different class to the ‘filled’ areas – in addition to how thick those boundaries should be.
The multichannelOutput option controls whether the image will be binary (if true) or labeled (if false).
Finally, the builder makes it possible to assign distinct classifications within the image to have the same label in the output, and also to skip particular classifications (i.e. ignore the corresponding annotations).
Tip
When using labeled images for output, labels will be drawn in the order they are provided to the builder – which can be important.
For example, in the above example Tumor is drawn first and Stroma second. If Tumor and Stroma annotations overlap for any pixel, Stroma will win.
Knowing this when annotating means that at interfaces you only really need to carefully annotate the classes that will be drawn last – because they will override any overlapping classes.
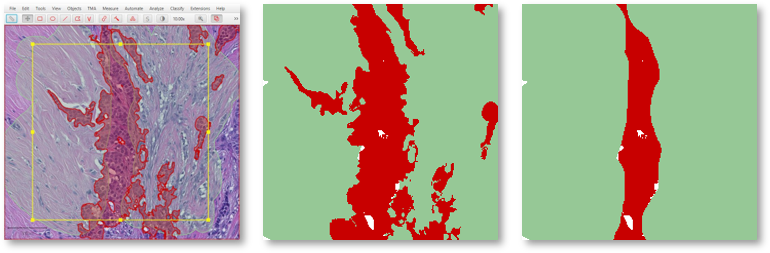
A coarse stroma annotation with finer tumor annotation (left), exported as a labeled image with stroma first (center) or tumor first (right).
Full labeled image
A modified form of the above script can be used to export a single labeled image corresponding to the entire image.
def imageData = getCurrentImageData()

// Define output path (relative to project)
def outputDir = buildFilePath(PROJECT_BASE_DIR, 'export')
mkdirs(outputDir)
def name = GeneralTools.getNameWithoutExtension(imageData.getServer().getMetadata().getName())
def path = buildFilePath(outputDir, name + "-labels.png")

// Define how much to downsample during export (may be required for large images)
double downsample = 8

// Create an ImageServer where the pixels are derived from annotations
def labelServer = new LabeledImageServer.Builder(imageData)
  .backgroundLabel(0, ColorTools.WHITE) // Specify background label (usually 0 or 255)
  .downsample(downsample)    // Choose server resolution; this should match the resolution at which tiles are exported
  .addLabel('Tumor', 1)      // Choose output labels (the order matters!)
  .addLabel('Stroma', 2)
  .addLabel('Other', 3)
  .multichannelOutput(false) // If true, each label refers to the channel of a multichannel binary image (required for multiclass probability)
  .build()

// Write the image
writeImage(labelServer, path)
Warning
It is usually neither necessary nor desireable to export labels for an entire whole slide image at full resolution – it is also not possible for some image formats (the images are just too big).
You can adjust the downsample value to help deal with this, or choose .ome.tif as the extension to write an image pyramid.
Labeled tiles
A LabeledImageServer can also be used along with the Tile Exporter described previously to write ‘pairs’ of image tiles, where one contains the original pixels and the other the corresponding annotations.
The following script applies this to export overlapping image tiles, and associated multichannel binary labels for Tumor and Stroma.
import qupath.lib.images.servers.LabeledImageServer

def imageData = getCurrentImageData()

// Define output path (relative to project)
def name = GeneralTools.getNameWithoutExtension(imageData.getServer().getMetadata().getName())
def pathOutput = buildFilePath(PROJECT_BASE_DIR, 'tiles', name)
mkdirs(pathOutput)

// Define output resolution
double requestedPixelSize = 10.0

// Convert to downsample
double downsample = requestedPixelSize / imageData.getServer().getPixelCalibration().getAveragedPixelSize()

// Create an ImageServer where the pixels are derived from annotations
def labelServer = new LabeledImageServer.Builder(imageData)
    .backgroundLabel(0, ColorTools.WHITE) // Specify background label (usually 0 or 255)
    .downsample(downsample)    // Choose server resolution; this should match the resolution at which tiles are exported
    .addLabel('Tumor', 1)      // Choose output labels (the order matters!)
    .addLabel('Stroma', 2)
    .multichannelOutput(true)  // If true, each label is a different channel (required for multiclass probability)
    .build()

// Create an exporter that requests corresponding tiles from the original & labeled image servers
new TileExporter(imageData)
    .downsample(downsample)     // Define export resolution
    .imageExtension('.jpg')     // Define file extension for original pixels (often .tif, .jpg, '.png' or '.ome.tif')
    .tileSize(512)              // Define size of each tile, in pixels
    .labeledServer(labelServer) // Define the labeled image server to use (i.e. the one we just built)
    .annotatedTilesOnly(false)  // If true, only export tiles if there is a (labeled) annotation present
    .overlap(64)                // Define overlap, in pixel units at the export resolution
    .writeTiles(pathOutput)     // Write tiles to the specified directory

print 'Done!'