OMERO
This page describes the QuPath OMERO extension, which is the current extension created and maintained by the QuPath team. It’s compatible with QuPath v0.6.0 and later. It has been completely rewritten to provide features and flexibility, including the ability to retrieve pixel values - including raw values - in different ways, depending upon how the OMERO server is set up (see the Retrieving pixel values section).
Caution
Two other OMERO extensions exist:
The QuPath Web OMERO extension is the original (now deprecated) version developed by the QuPath team. It only allows JPEG-compressed RGB images to be accessed (no raw pixel values, no support for non-RGB images).
The BIOP OMERO extension, developed by the BioImaging and Optics Platform (BIOP) to address the limitations of the QuPath Web OMERO extension. This provides access to raw pixels using the OMERO Gateway API only. It also adds more features, many of which have now been incorporated into the main QuPath OMERO extension.
See Migrating from QuPath Web OMERO extension if you previously used the QuPath Web OMERO extension and want to make your QuPath projects usable by this extension.
QuPath’s OMERO extension
Installing the extension
The installation instructions can be found on the GitHub page of the extension.
Browsing an OMERO server
You can browse OMERO servers via the command.
The menu will list all the servers that were opened in QuPath, from which you can choose the one to browse.
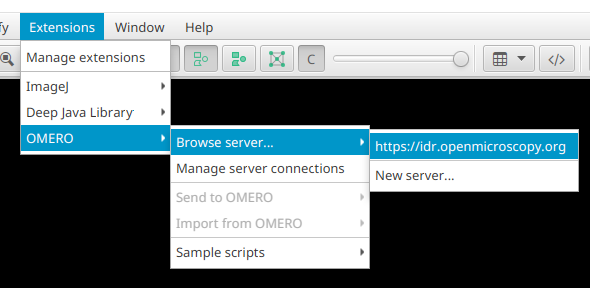
Selecting an OMERO server to browse
You can browse an existing OMERO server, or a new one (with which no connection was previously established) by clicking on New server…. The URL is the one you use when accessing the OMERO server with a web browser (e.g. https://idr.openmicroscopy.org) and there are two possibilities for the credentials:
You can check the
Log in as a public usercheckbox. That way, you will be able to browse the server without giving a username/password combination by using a public account (provided the server allows it). However, some features of the extension won’t be available (see the Send data to an OMERO server section for example).If you don’t check the
Log in as a public usercheckbox, you will have to give your OMERO credentials but you won’t have any of the restrictions mentioned above.
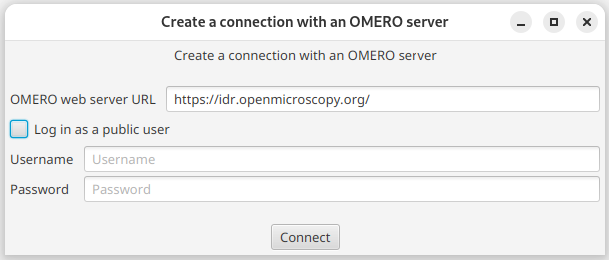
Connecting to a new OMERO server
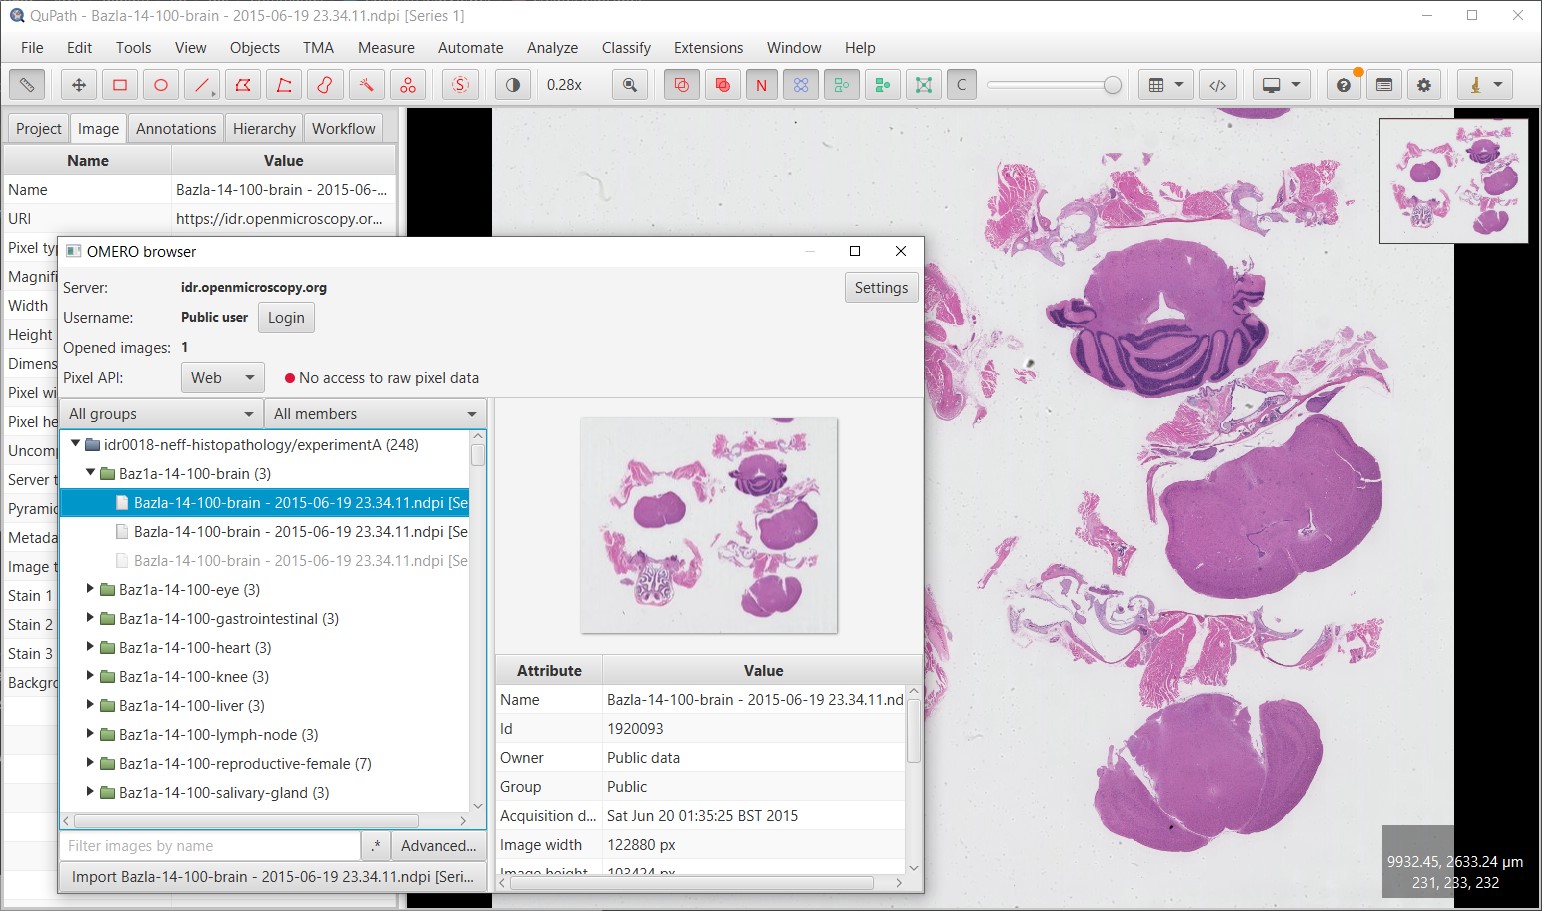
The browser will display all the projects, datasets, images, screens, plates, and wells filtered by OMERO group and owner. The design is very similar to OMERO’s webclient.

The OMERO browser (showing http://idr.openmicroscopy.org)
You can open an individual image by double-clicking on it. Alternatively, select the relevant projects/datasets/images and click on Import <entity> to QuPath.
Tip
You can display more OMERO information on the selected file such as tags, key-value pairs and comments with .
To query a file on the OMERO server, one can also access the Advanced… feature, which will search the dataset for the input query. Again, the results can be opened by either double-clicking on them or by selecting them and clicking on Import <entity> to QuPath.
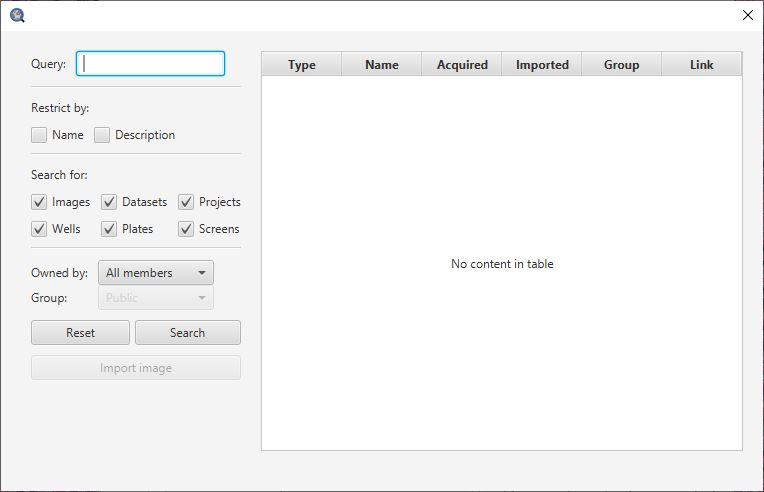
The advanced search
Opening OMERO images
Opening OMERO images can be done in three ways:
(Shortcut Ctrl + Shift + O) and enter the URL of your OMERO image.
and click
Input URLorFrom clipboard.Via the OMERO browser (see Browsing an OMERO server).
URL formats
QuPath only accepts the following OMERO URL image formats:
<omero-web-server>/webclient/?show=image-<imageId><omero-web-server>/webclient/img_detail/<imageId>/<omero-web-server>/webgateway/img_detail/<imageId>/<omero-web-server>/iviewer/?images=<imageId>
E.g. https://idr.openmicroscopy.org/webclient/?show=image-1920093
Tip
The extension also accepts links to datasets and projects, in which case all compatible images inside them will be fetched and added to the current project. The supported URL formats for projects and datasets are the following:
<omero-web-server>/webclient/?show=project-<projectId><omero-web-server>/webclient/?show=dataset-<datasetId>
If no active connection with the OMERO server exists, QuPath will prompt you to enter your credentials, as mentioned in the Browsing an OMERO server section.
Retrieving pixel values
The extension can use three different methods (called ‘pixel APIs’) to retrieve pixel values:
The web pixel API: this method is enabled by default and is available on every OMERO server. It is fast but only 8-bit RGB images can be read, and they are JPEG-compressed. This effectively means it is most useful for viewing and annotating RGB images (including whole slide images), but is not suitable for quantitative analysis where JPEG compression artifacts would be problematic.
The Ice pixel API: this method can read every image and access raw pixel values, so it doesn’t have the limitations of the web pixel API. However, you have to install additional dependencies to enable it. Take a look at the extension page to see how to install them.
Note that it is not possible to use the Ice pixel API when accessing an OMERO server with a public account, you have to be authenticated.
If you can’t open any image with the Ice pixel API, it may be because the OMERO.server instance is on a different server than the OMERO.web instance. You can define a different address and port to the OMERO.server in the settings of the extension, accessible in the browser (these parameters will only be used if the extension cannot by itself determine the address of the OMERO.server):
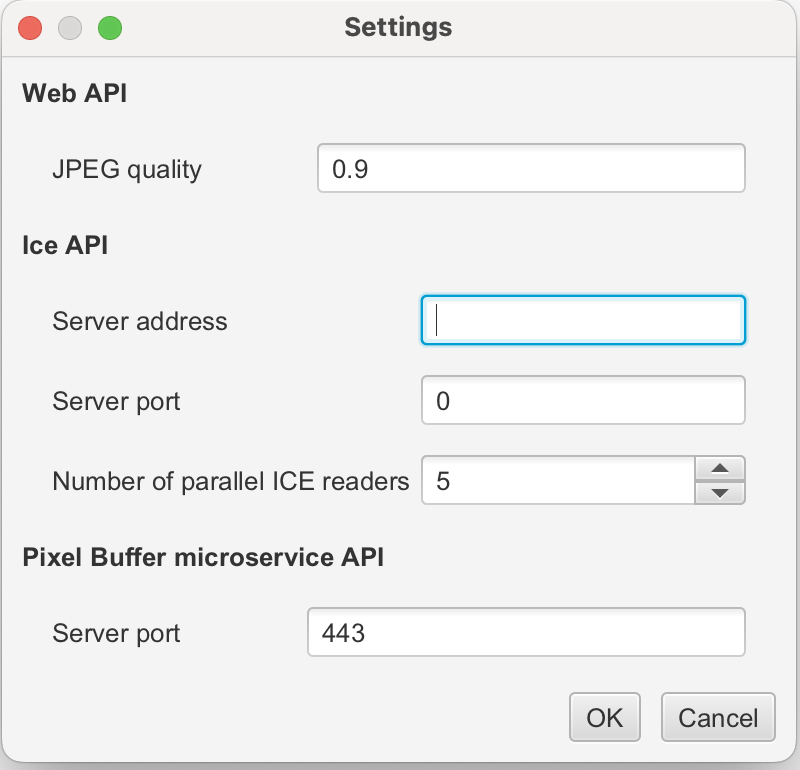
Setting the address and port of an OMERO.server instance
You can also set on this window the number of parallel ICE readers. This corresponds to the maximum number of workers that can simultaneously read an image. Generally, setting a higher value results in faster image reading. However, this may also overload the OMERO server, especially if it runs on lower-end hardware.
Caution
Define a higher number of ICE readers only if you are sure that the OMERO server can handle it. If too many users with too many readers access the same OMERO server at the same time, the server may crash.
Note that two images belonging to two different groups of the same server cannot currently be read at the same time with the Ice pixel API (see this issue). Also, consecutively opening images of different groups can create problems (see this issue).
The pixel data microservice API: this method can read every image and access raw pixel values, without the limitations of the Ice pixel API. However, you need to install the OMERO Pixel Data Microservice on the OMERO server. If this plugin is installed and the OMERO extension cannot detect it, check that the port indicated in the settings of the extension corresponds to the port used by the microservice on the OMERO server. The default port (
443) is the defaulthttpsport. If your server useshttp, specify80. If you specified a different port in the microservice configuration (like for example8082), specify this port.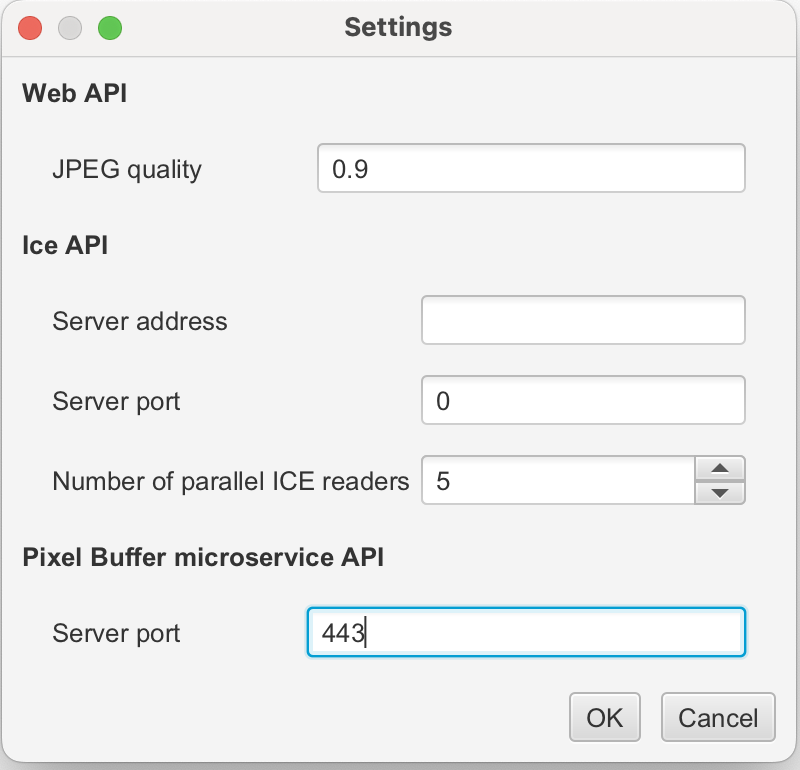
Setting the port of the pixel data microservice
Here is a recap of the three pixel APIs:
Pixel API |
Raw pixel access |
Can read |
Accessible for |
Installation |
|---|---|---|---|---|
Web |
❌ |
8-bit RGB images |
Any user |
Installed by default |
Ice |
✅ |
Any image |
Authenticated users |
Need OMERO Java dependencies on QuPath |
Pixel data microservice |
✅ |
Any image |
Any user |
Need Pixel Data Microservice on the OMERO server |
Note
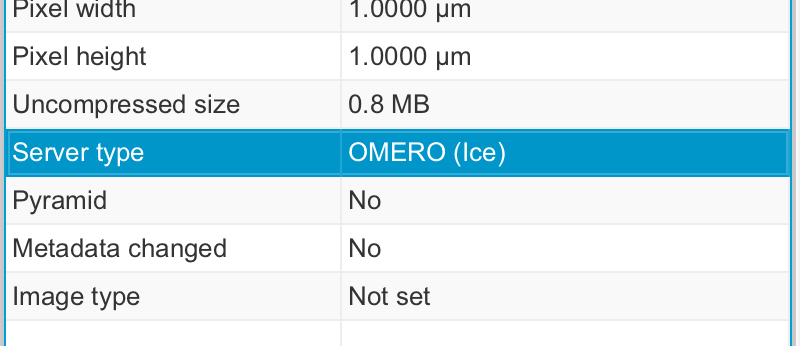
These APIs are only about retrieving pixel values. Everything else (for example image metadata) is retrieved using calls to the OMERO web server. Therefore, the URI displayed in the Image tab of QuPath might not reflect the API used to retrieve pixel values. You can see which pixel API is used by looking at the Server type entry:
An image opened with the Ice pixel API
In the browser, before opening an image, you can select which pixel API to use. A green or red dot next to the currently selected pixel API indicates if it provides access to raw pixel data.
Selecting a pixel API
Note
Once an image is open with a certain pixel API, the same pixel API will always be used when the image is reopened later.
If no pixel API was selected in the browser, the ‘best’ available pixel API is used (
Ice pixel APIorpixel data microservice APIif one of them is available,web pixel APIotherwise).
Sending data to an OMERO server
Once an OMERO image is open in QuPath, you have the possibility to send data from QuPath to the OMERO server.
Caution
Before sending information to an OMERO server, you must make sure that the user you are connected with has sufficient rights to write data to the OMERO server. This won’t probably be the case if you are connected with the public account.
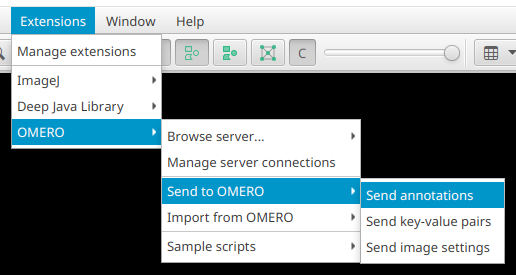
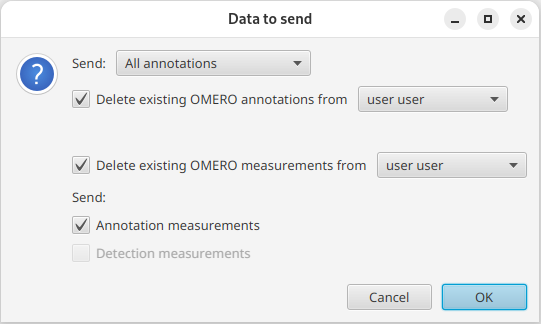
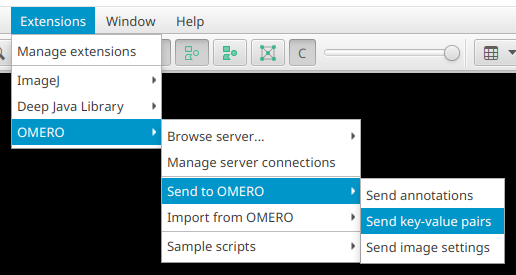
Sending annotations
The extension can send annotations to the OMERO server. To do so, select the annotations on your image that you want to send and click on . The annotations will be represented as ROIs on the OMERO server.
|
|
Sending annotations from QuPath to the OMERO server |
Parameter selection |
You have the possibility to delete annotations already present on the OMERO server. Since some groups allow multiple users to send annotations to the same image, you can delete the annotations of all or of one specific user. Note that you will only see users for whom you have sufficient permissions to delete annotations.
Note
The user interface only lets the possibility to send annotations, not detections. This is because OMERO does not well support sending thousands of objects. If you do so, you might make the entire server unresponsive.
Caution
If you open the OMERO image with the OMERO.iviewer, you will see the annotations. They will have a comment that you shouldn’t modify; it is used by the extension to store QuPath specific information about the annotation (e.g. class name).
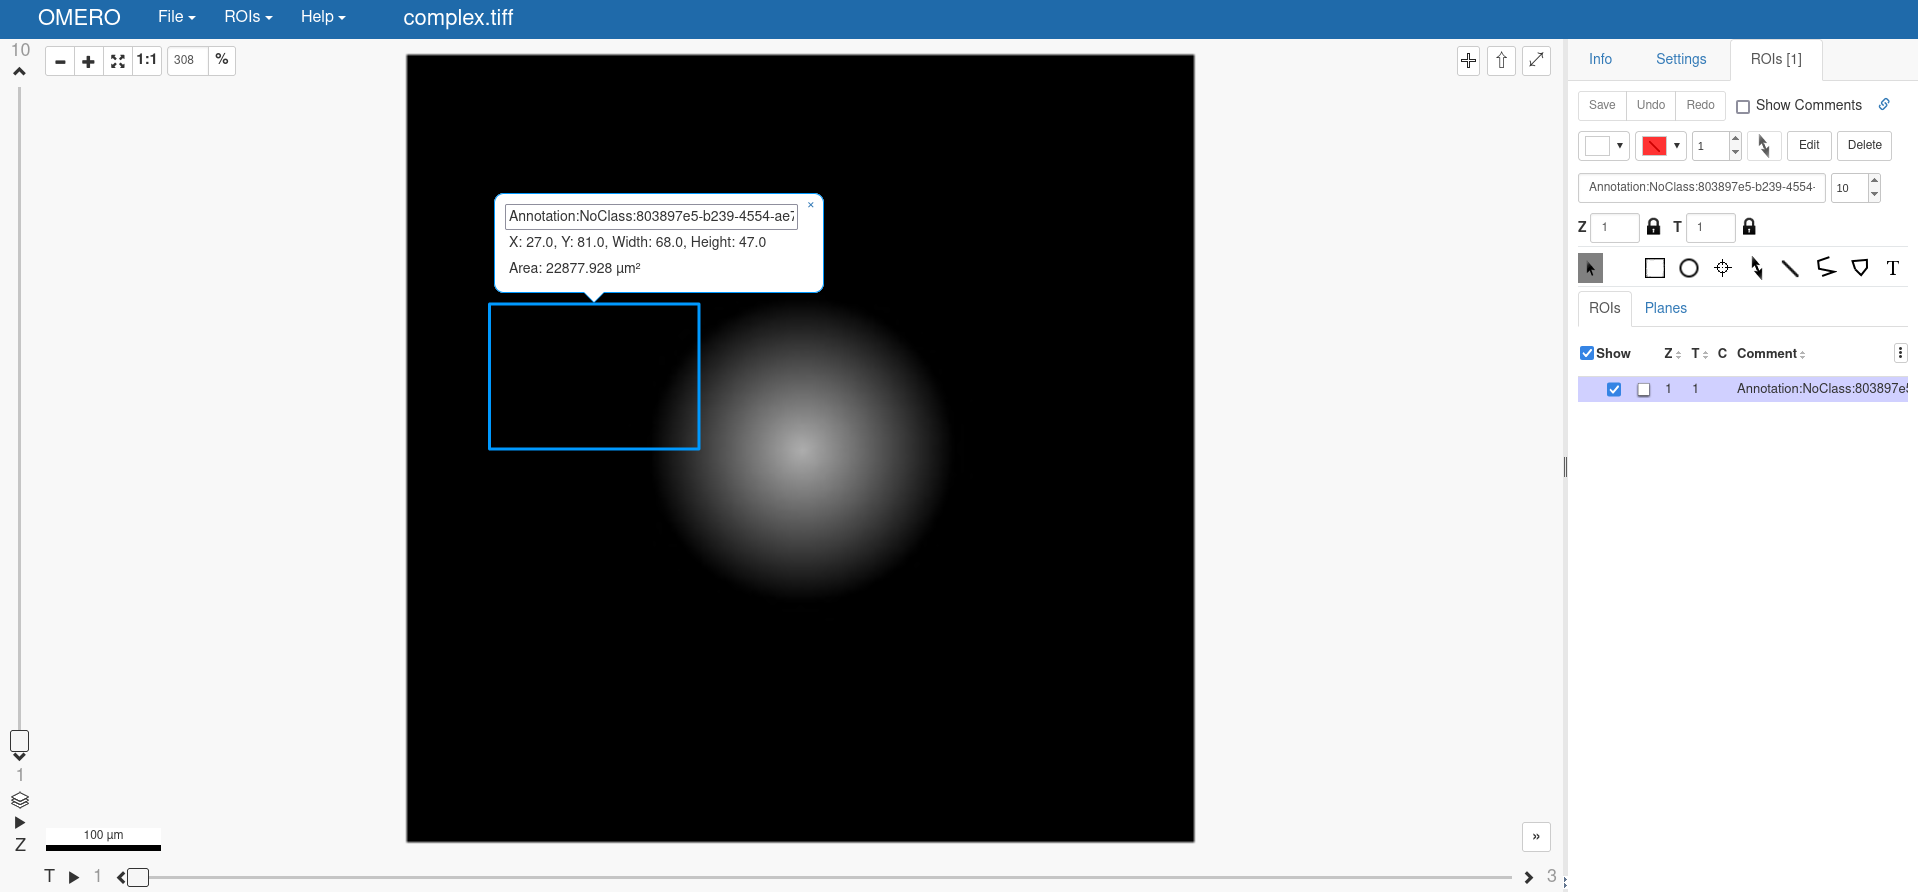
An annotation on the OMERO server
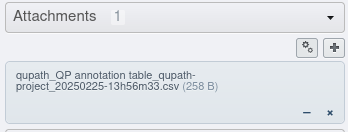
If the QuPath image contains annotation or detection measurements (see or ), they can also be sent to the OMERO server. They will be stored as Attachments on the OMERO server. As with annotations, you can delete existing measurements of a specific user or of all users.
Annotation measurements on the OMERO server
Caution
Due to the way the measurement exporter was created, it is (currently) only possible to send annotation or detection measurements when a QuPath project is open.
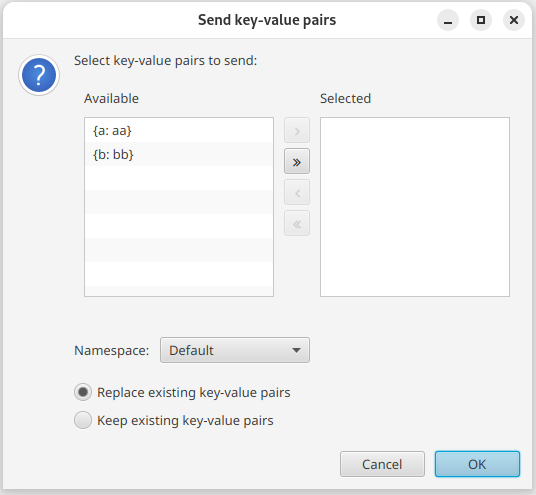
Sending key-value pairs
Each image of a QuPath project has metadata (which consist of key-value pairs) attached to it. This metadata can be sent to the OMERO server by clicking on .
|
|
Sending key-value pairs from QuPath to the OMERO server |
Parameter selection |
You can select which pairs to send, as well as how to proceed if two keys are duplicate. An OMERO server can store multiple keys, while keys in QuPath are unique:
If you choose “Replace existing key-value pairs”, all existing keys will be replaced and a new bloc of key-value pairs will be created for new keys.
If you choose “Keep existing key-value pairs”, a new bloc of key-value pairs is created with the new values.
In OMERO, key-value pairs can be grouped by a namespace. You can choose which namespace to use when sending key-value pairs.
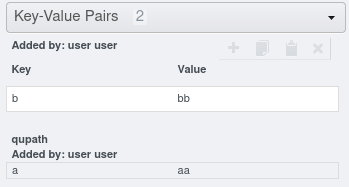
Key-value pairs with the default and the qupath namespace on the OMERO server
Caution
Since key-value pairs are only defined when the image is part of a QuPath project, sending key-value pairs is only possible when a project is open.
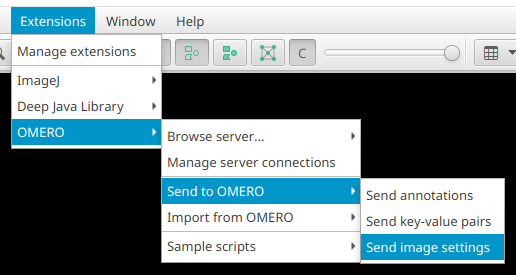
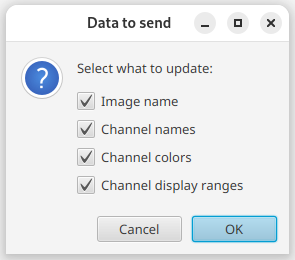
Sending image settings
In QuPath, the channel names, colors, and display ranges of the current image can be found by clicking on . This data (as well as the image name is a project is open) can be sent to OMERO by clicking on .
|
|
Sending image settings from QuPath to the OMERO server |
Parameter selection |
Caution
The image name can only be sent when a project is open.
Importing data from an OMERO server
Once an OMERO image is open in QuPath, you have the possibility to import data from the OMERO server to QuPath.
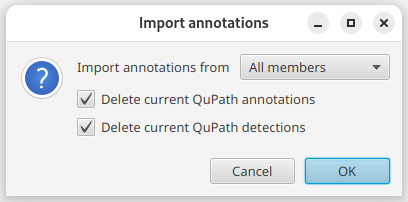
Importing annotations
The extension can import ROIs stored on an OMERO server and convert them to QuPath annotations by clicking on .
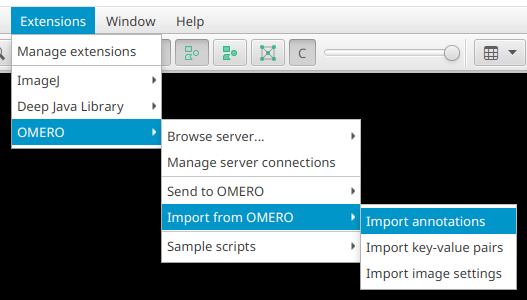
|
|
Importing annotations from an OMERO server to QuPath |
Parameter selection |
It is possible to delete all existing annotations and detections of the current QuPath image before importing annotations.
Note
If the ROIs to import were created by this extension, the created annotations will have the same properties (e.g. class name) as the annotations that were used to create the ROIs (see the Send annotations section).
Importing key-value pairs
An image stored on an OMERO server can store key-value pairs. This data can be imported to QuPath and added to the metadata of the project entry by clicking on .
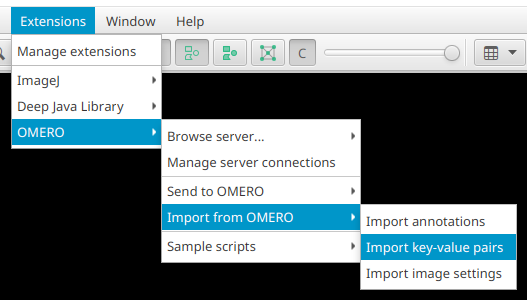
|

|
Importing key-value pairs from an OMERO server to QuPath |
Parameter selection |
In OMERO, key-value pairs can be grouped by a namespace. You can select which namespaces to consider when importing key-value pairs.
QuPath metadata can only have unique keys. Therefore, you can specify what to do when a duplicate happens.
Note
When importing an image to a QuPath project from the browser (see the Browsing an OMERO server section), key-value pairs of the default namespace and the parent entity ID/name of the OMERO image are automatically imported. This can be disabled by unchecking .
Caution
Since key-value pairs are only defined when the image is part of a QuPath project, importing key-value pairs is only possible when a project is open.
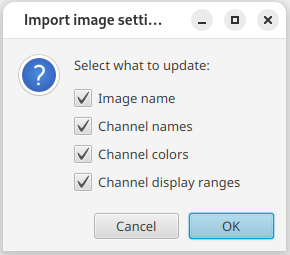
Importing image settings
The channel names, colors, and display ranges of the current image, as well as the image name, can be imported from OMERO by clicking on .
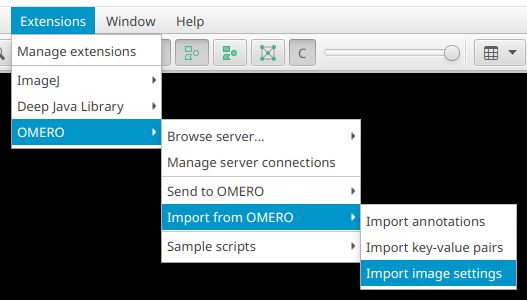
|
|
Importing image settings from an OMERO server to QuPath |
Parameter selection |
You can select what specific parameters you want to update.
Caution
The image name can only be imported when a project is open.
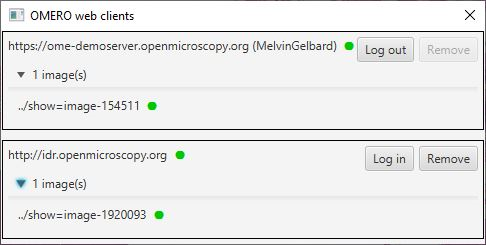
Managing OMERO clients
QuPath allows you to manage all active and inactive OMERO clients. To display a pane with all OMERO clients, navigate to .
There, a window displaying the servers to which a previous connection was made allows you to log in, browse, log out and remove (forget) it.
If an account with authentication is currently connected to the server, its username will be written in parenthesis next to the server’s URL.
The green circle next to a server indicates whether there is an active connection to the server. The green circle next to the images’ URI indicates whether the image can be accessed with the current account.
Managing OMERO server connections
In the example above, the user user is connected to the first server (http://localhost:4080) and the connection with the second server (http://idr.openmicroscopy.org) uses the public account (no username/password).
Note
Different OMERO accounts can be logged into different remote servers simultaneously (e.g. account A to server X and account B to server Y). But a remote server can only be reached with one OMERO account simultaneously.
Be aware that the
Web clientswindow displays how QuPath handles connections to OMERO servers. It does not directly relate to your project. For example, deleting a project entry or switching projects will not affect the OMERO connections in any way, and vice-versa.
Scripting
Every feature of the extension can be run from a Groovy script with or without the user interface.
Some sample scripts have been created to show the basic features of the extension. They are accessible:
Through the user interface, by clicking on
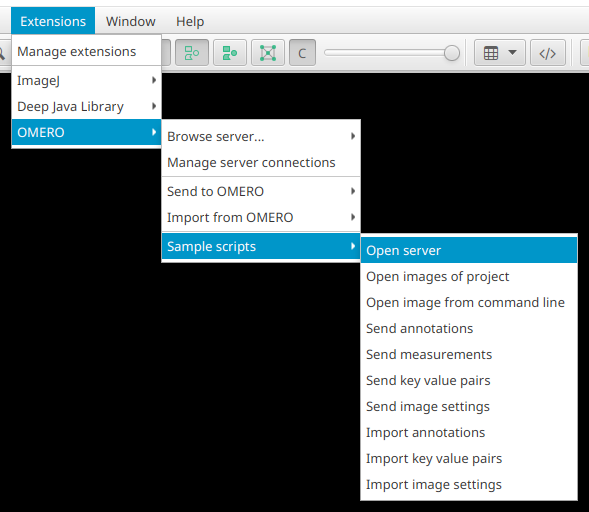
Opening a sample script
In this folder.
Migrating from QuPath Web OMERO extension
If you previously used the QuPath Web OMERO extension and want to update your projects to this extension:
Open each project’s
project.qpprojwith a text editor.Replace every
qupath.lib.images.servers.omero.OmeroWebImageServerBuilderbyqupath.ext.omero.core.imageserver.OmeroImageServerBuilder.