ImageJ
QuPath was created by someone who was (and is) a big fan of ImageJ.
Some elements of QuPath are designed to be familiar for ImageJ users. This includes the design of some icons in the toolbar to the choice of shortcuts (e.g. Ctrl+L for a command list).
Part of ImageJ’s success comes from its fantastic extensibility, as seen in the huge range of plugins that have been written for it and the popularity of Fiji as an ImageJ distribution for the life sciences.
In fact, QuPath started life as a collection of ImageJ plugins for digital pathology. Over time, the situation flipped around: QuPath was rewritten from scratch as a completely new application, which uses ImageJ as an extension.
QuPath & Fiji
By default, QuPath only integrates directly with the ‘original’ ImageJ. See Building with Fiji if you want to link QuPath with Fiji.
There’s a lot that QuPath can do that ImageJ can’t, especially when it comes to working with whole slide images and object classification. But it works the other way too: there’s also a lot that’s possible with ImageJ, but which isn’t possible with QuPath alone.
Fortunately, you don’t have to choose one or the other. They are both open and can be used together.
Finding ImageJ commands
The commands described here are accessible from the ImageJ toolbar button in QuPath, and also in the submenu.

ImageJ menu in the QuPath toolbar
Sending image regions to ImageJ
In general, ImageJ can’t open whole slide images directly – they are just too big.
Attempts often end in a dreaded ArrayIndexOutOfBoundsException message, as ImageJ attempts to squeeze all the pixels for each 2D plane into the computer’s memory as a single Java array.
Even if you have a lot of RAM, Java arrays are limited to ~231 elements – which often isn’t enough.
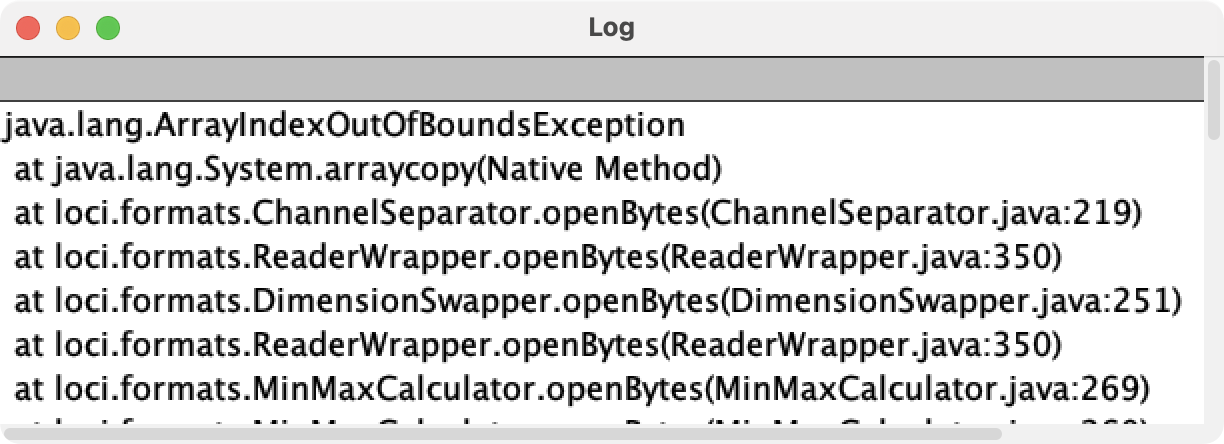
Common error when trying to open a whole slide image with ImageJ/Fiji + Bio-Formats
QuPath gets around this by quickly pulling out only the bits of the image that it needs at any one moment, and remembering what it has seen for as long as its memory can cope with… then selectively forgetting old parts of the image, to make space for the new.
Using the excellent Bio-Formats plugin for ImageJ it’s possible to open some cropped regions of whole slide images within ImageJ, but this involves entering the coordinates for the desired region – which isn’t always very easy to do.
The alternative is to:
Open the image in QuPath
Interactively draw an annotation around any region of interest
Click
 .
.
QuPath then launches its embedded ImageJ and passes the pixels from within the selected region.
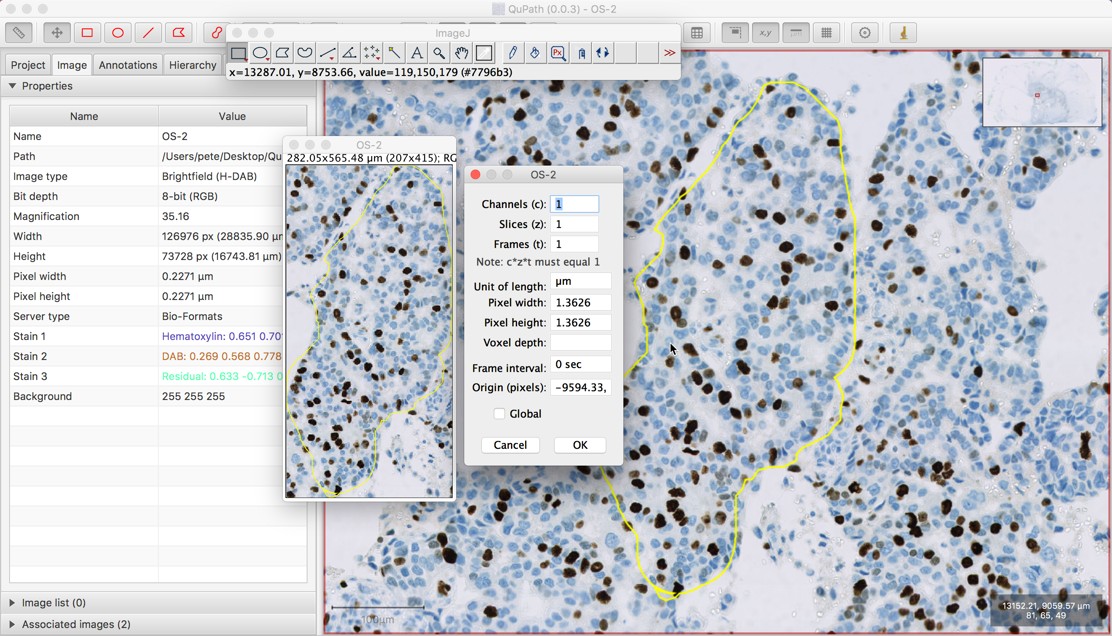
Sending an image region to ImageJ
Downsampling and image calibration
When running , you have some options.
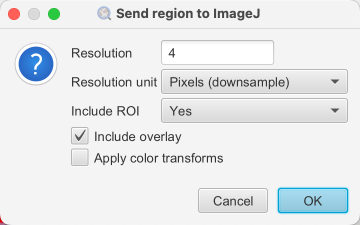
‘Send region to ImageJ’ dialog
The resolution effectively controls how the image should be scaled when it is being sent to ImageJ. There are two ways this can be defined:
In ‘pixel’ (or ‘downsample’) units. A value of 1.0 means that the full resolution image will be sent. A value of 2.0 means that the image will be downsampled by a factor of 2, so the width and height of the image are halved.
In ‘µm’ units (where available). Here, a value of 1.0 means that the image is rescaled to try to make the pixel width and height correspond to 1 µm.
This is extremely important, since sending a very large region at the maximum high resolution (i.e. downsample of 1) is quite likely to fail for the same reason that you can’t open a whole slide image in ImageJ. Therefore the area of the region selected to send, along with the downsampling, together control how large an image (in terms of pixels, and therefore memory) will be sent.
In the screenshot above, the downsampling value was set to 4. However, this information is not lost. If you run in ImageJ, you see that the pixel size is 4 times larger than it is in QuPath. This means that measurements made within QuPath and ImageJ should be comparable, because the images in both places have been calibrated accordingly.
Note
Image Properties… can also encode an Origin value. This tells ImageJ that the image it has was extracted from something larger, and indicates where in the larger image it came from.
This is what makes it possible to send information from ImageJ back to QuPath, and have it rescaled and translated appropriately.
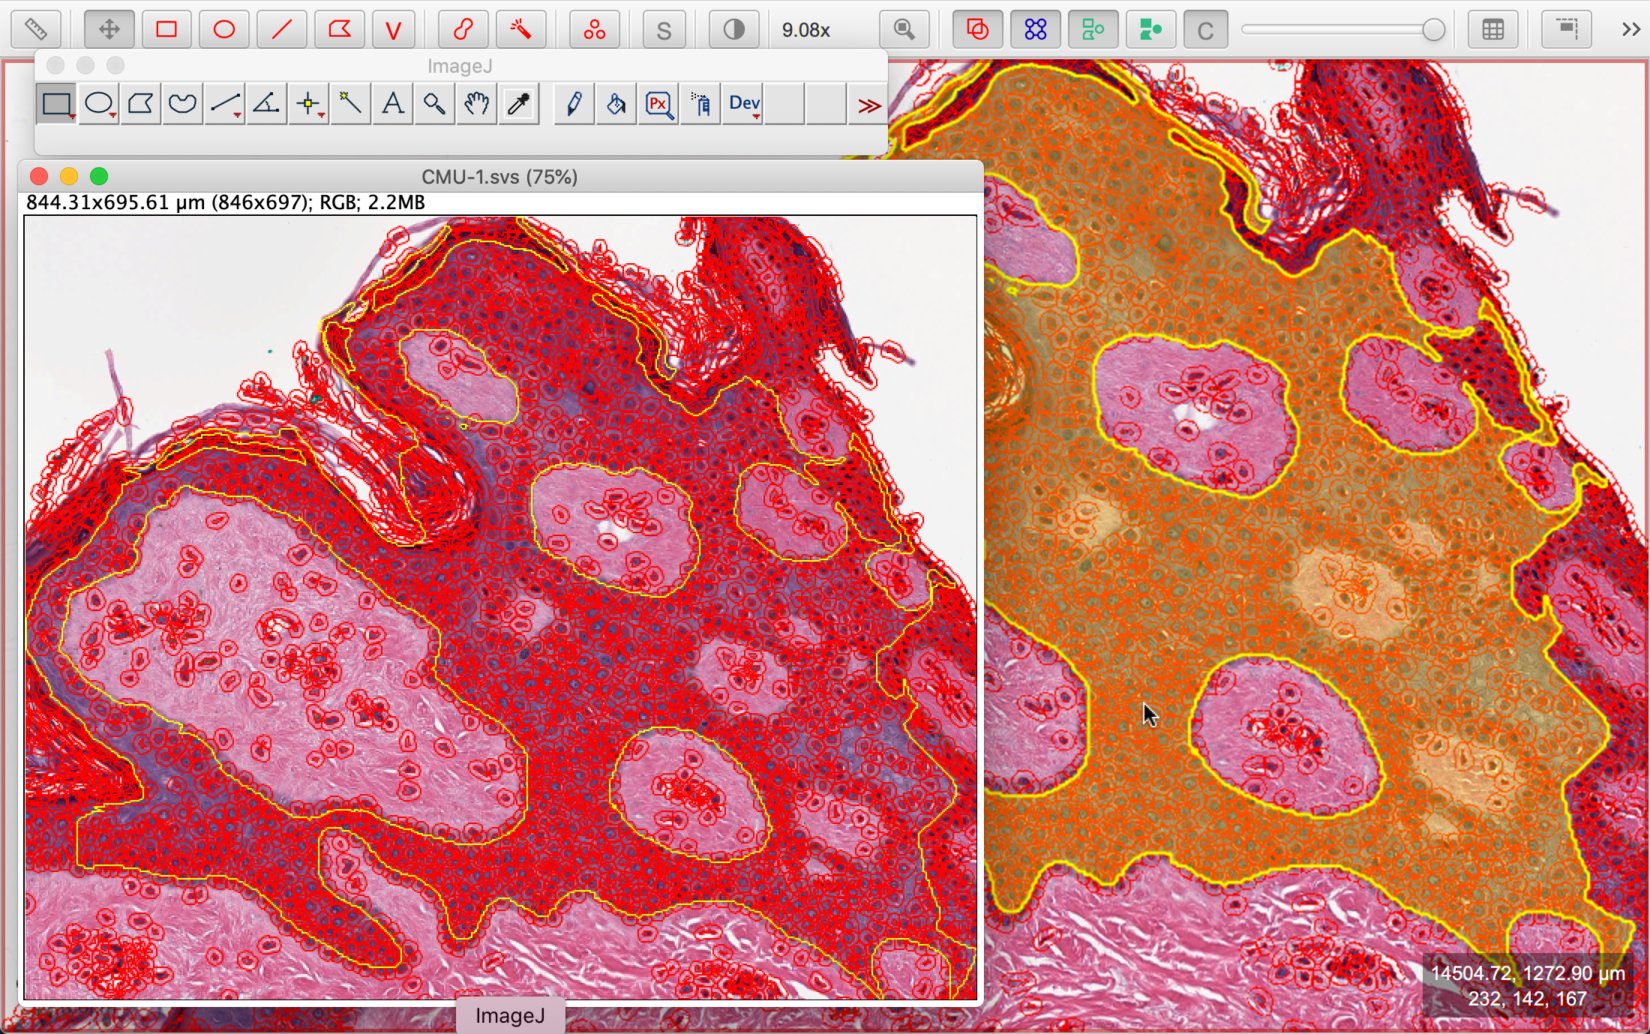
Color transforms
The command also works with color transforms that can be applied in QuPath using the dialog (or by pressing one of the numeric keys). These include techniques such as color deconvolution to digitally separate stains.
When such a color transform has been applied, QuPath will pass the transformed pixels, not the raw values.
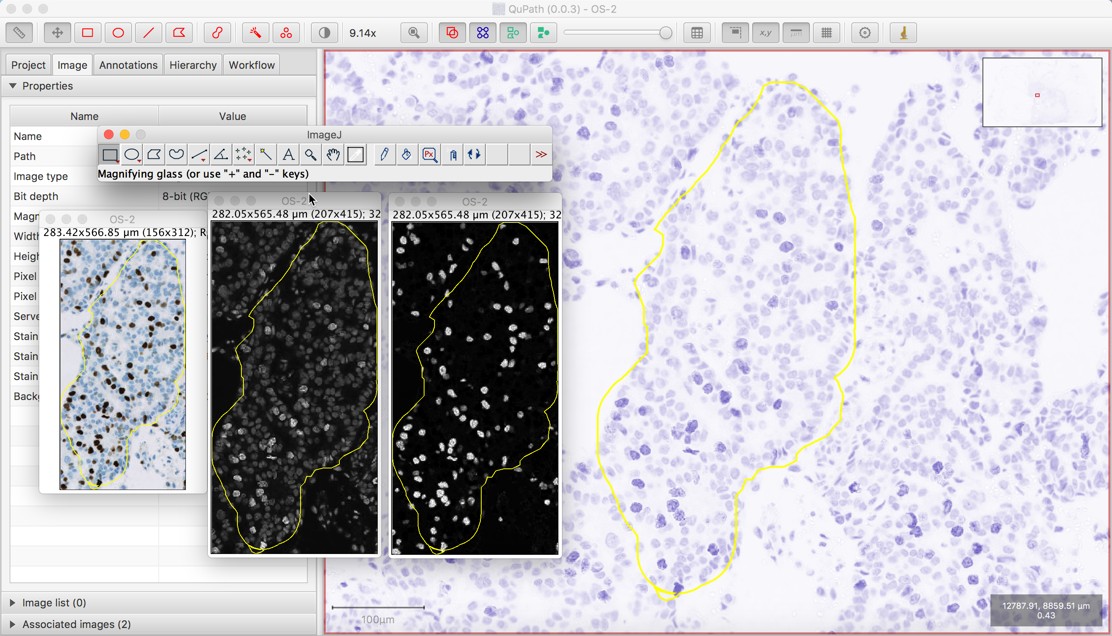
Sending a color-transformed image region to ImageJ
In the screenshot above, the original image was sent first by running the Send region to ImageJ command, and then hematoxylin and DAB transformed images were also sent (separately) in the same way, after applying the appropriate transform within QuPath.
Note
If you look closely at the screenshot, you should see that the color-transformed images were sent using a different downsample factor compared to the original (RGB) image. This is evident not only from the sizes of the images as they are displayed, but also from the text at the top of each of the three image windows – where it can be confirmed that the transformed images are have different sizes in terms of pixels.
However, because QuPath sets the image properties (i.e. pixel sizes) while taking the downsampling into consideration, the sizes of the fields of view in µm are almost identical.
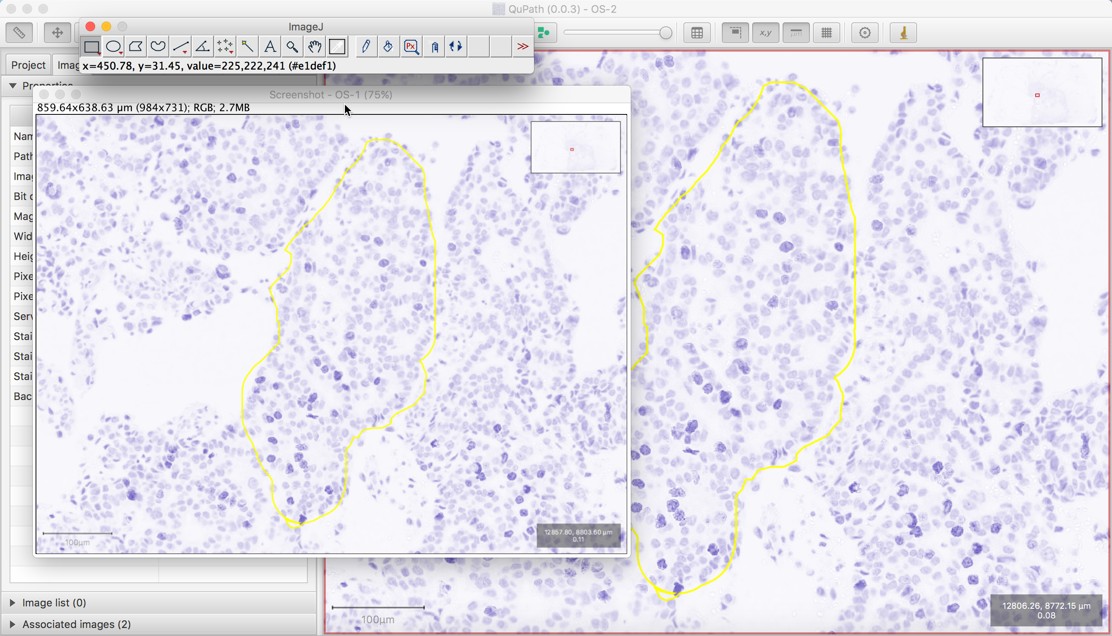
QuPath objects and ImageJ ROIs
The closest thing that ImageJ has to a QuPath object is an ImageJ ROI (Region Of Interest – sometimes also called a Selection). Similarly, where QuPath stores multiple objects relating to a single image in a hierarchy, ImageJ uses overlays.
ImageJ ROIs and overlays cannot represent all the same information that can be contained within QuPath objects and hierarchies, but they can contain some. Consequently, when sending an image region to ImageJ, QuPath uses them to make its best effort to convert its objects into the most ImageJ-friendly form that it can.
Sending an image region & objects to ImageJ
The screenshot above shows how this works. The selected object within QuPath defines the region that will be sent, and this becomes converted into a selected ROI in ImageJ (shown in yellow in both applications). All other QuPath objects within the region are converted into ROIs and added to the ImageJ overlay.
The names of the ROIs are also set according to how they appear in QuPath, often based upon their classification. In the above screenshot, the ImageJ command was run to create the list that is shown, where each ROI’s name can be seen.
Tip
Since v0.4.0, you can import saved ImageJ ROIs using - or, even handier, by drag & drop onto a QuPath viewer.
This includes both .roi and RoiSet.zip files saved through ImageJ’s ROI Manager.
Sending snapshots
Finally, there is also a  .
.
This will also launch ImageJ, this time giving it a screenshot from the current viewer instead of raw pixel values. The result will be similar to what is generated in QuPath with the command.
Sending a snapshot image to ImageJ
Note that the snapshot command is really only for creating screenshots – not for transferring images for further analysis. The snapshot that is available within ImageJ will be RGB, and does not contain the pixel values or calibration information that is available when is used instead.
Accessing ImageJ plugins
One application of passing image regions to ImageJ is simply to use ImageJ’s commands to save the image regions or to create figures. But it can also be helpful to apply some extra processing within ImageJ, including external ImageJ plugins.
Because QuPath keeps its own version of ImageJ internally, instead of using another installation you might have, it won’t necessarily have immediate access to the plugins you want. However, you can set QuPath’s ImageJ to use the directory belonging to a different ImageJ installation if you like using .
Sending objects to QuPath
Sometimes, after you’ve got an image into ImageJ and done some processing there, you might want to get some information back. Currently, there are two custom ImageJ plugins provided by QuPath that will allow you to do this. These are found inside ImageJ’s menu (probably at the bottom).
Send ROI to QuPath

Sending a ROI from ImageJ to QuPath
Running will take whichever ROI is currently active in ImageJ, and send it to QuPath as an annotation object. All rescaling etc. will happen automatically.
Send Overlay to QuPath
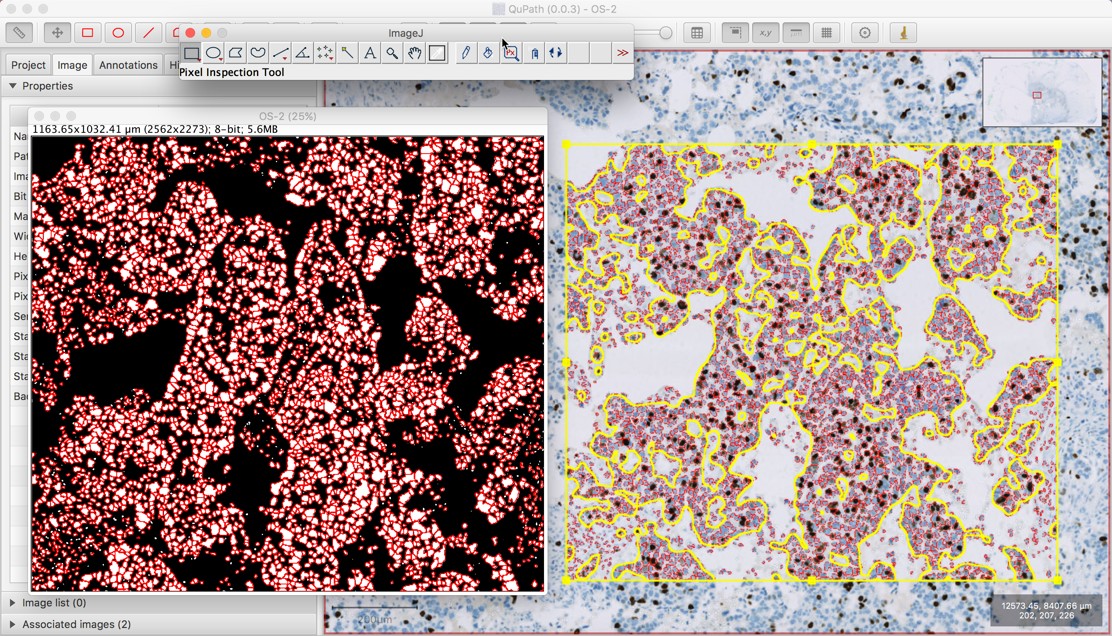
Sending an overlay from ImageJ to QuPath
Running will take all the ROIs on the current ImageJ overlay, and send them back to QuPath as either annotation or detection objects. Furthermore, the measurement list for each object can optionally be populated by ImageJ measurements, according to ImageJ’s specifications – in the same way as this command is used to specify measurements for the command.
This makes it possible to (for example) run some custom cell detection plugin written for ImageJ, which ends up putting the detected cells only an overlay, and then send back the results to QuPath.
Note
The command has the option of creating ROIs and adding them to an overlay – so this can be a good step along the way to creating an overlay in a QuPath-friendly format.
Running macros & scripts
Another excellent feature of ImageJ is its macro language, which enables automation in a similar way to QuPath’s scripts. Using this, it’s possible to develop custom detection algorithms to apply. However, applying these one by one via extensive use of the command would quickly become tiresome.
QuPath v0.6.0 introduces to help.
Auto-thresholding an entire image
Perhaps the easiest way to get started with the script runner is by using it for thresholding.
From within the script runner, you can use to get a built-in ImageJ macro for that purpose.
Running this on the CMU-1.svs image can apply an auto-threshold to a grayscale version of the image, using the Triangle method.
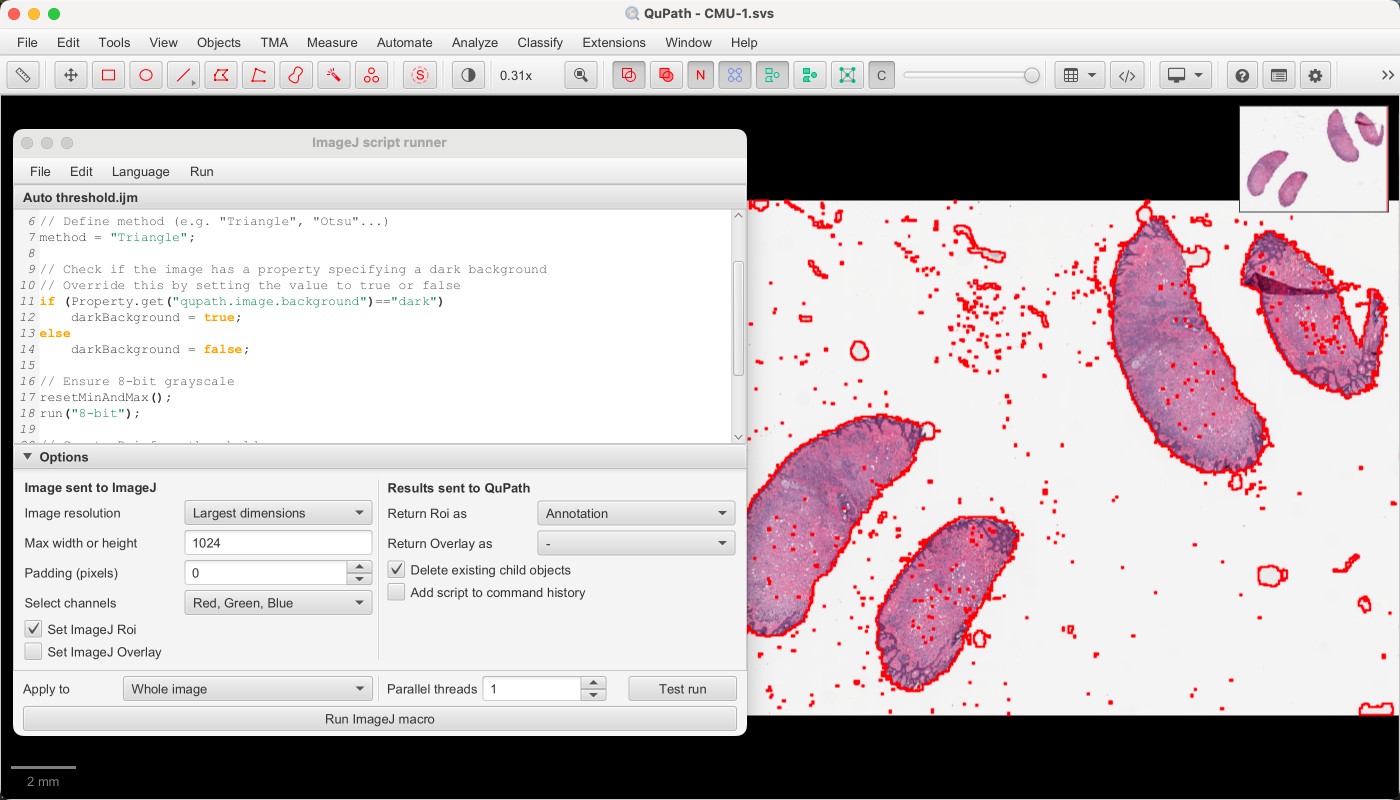
Auto-thresholding using the triangle method
The details really matter!
There are lots of options at the bottom of the script runner and they are important! These define which regions of the image will be sent to ImageJ, and also the resolution. They also define what will be returned to QuPath.
You can hover your mouse over any options for an explanation of what the option does.
The screenshot above is underwhelming, with lots of background areas detected.
But by slightly modifying the script – adding a Gaussian filter step, and switching to use Otsu’s method for thresholding – the results should be rather a lot better.

Auto-thresholding a smoothed image using Otsu’s method
Then, by selecting the checkbox to Add script to command history, it’s possible to create a QuPath script that can be applied to more images.
For example, the following script can be run in QuPath’s normal script editor:
qupath.imagej.gui.scripts.ImageJScriptRunner.fromMap(text: """/*
 * ImageJ macro to apply an automated threshold to detect a single region.
 * You will need to return the active Roi to see the results in QuPath.
 */

// Define method (e.g. "Triangle", "Otsu"...)
method = "Otsu";

// Check if the image has a property specifying a dark background
// Override this by setting the value to true or false
if (Property.get("qupath.image.background")=="dark")
    darkBackground = true;
else
    darkBackground = false;

// Ensure 8-bit grayscale
resetMinAndMax();
run("8-bit");
run("Gaussian Blur...", "sigma=2");

// Create Roi from threshold
if (darkBackground)
    setAutoThreshold(method + " dark");
else
    setAutoThreshold(method);
run("Create Selection");
""", downsample: [downsampleType: "maxDim", maxDimension: 1024.0], setRoi: true, setOverlay: false, closeOpenImages: false, clearChildObjects: true, activeRoiObjectType: "ANNOTATION", overlayRoiObjectType: "NONE", applyToObjects: "IMAGE", addToWorkflow: true, nThreads: 1).run()
Auto-thresholding within an annotation
The script above takes the entire image as input - resized so that the width and height are both less than or equal to 1024 pixels.
The screenshot below shows how the options can be adjusted, here to define the image resolution to be 5 µm/px and to restrict the threshold to a selected annotation.

Auto-thresholding within an existing annotation
Other script runner uses
The ImageJ script runner can do a lot more than thresholding.
For example, the following simple script adds ImageJ’s ‘circularity’ measurement to whatever ROI has been sent by QuPath.
// Measure circularity
circularity = getValue("Circ.");

// Add to the ImageJ Roi
Roi.setProperty("qupath.object.measurements.Circularity", circularity);
When QuPath receives a ROI back that is identical to a ROI that was sent, it doesn’t create a new object. Rather, it uses the properties to update the original object.
Therefore this script can be used to add a new measurement to all detections (cells) in an image, for example.
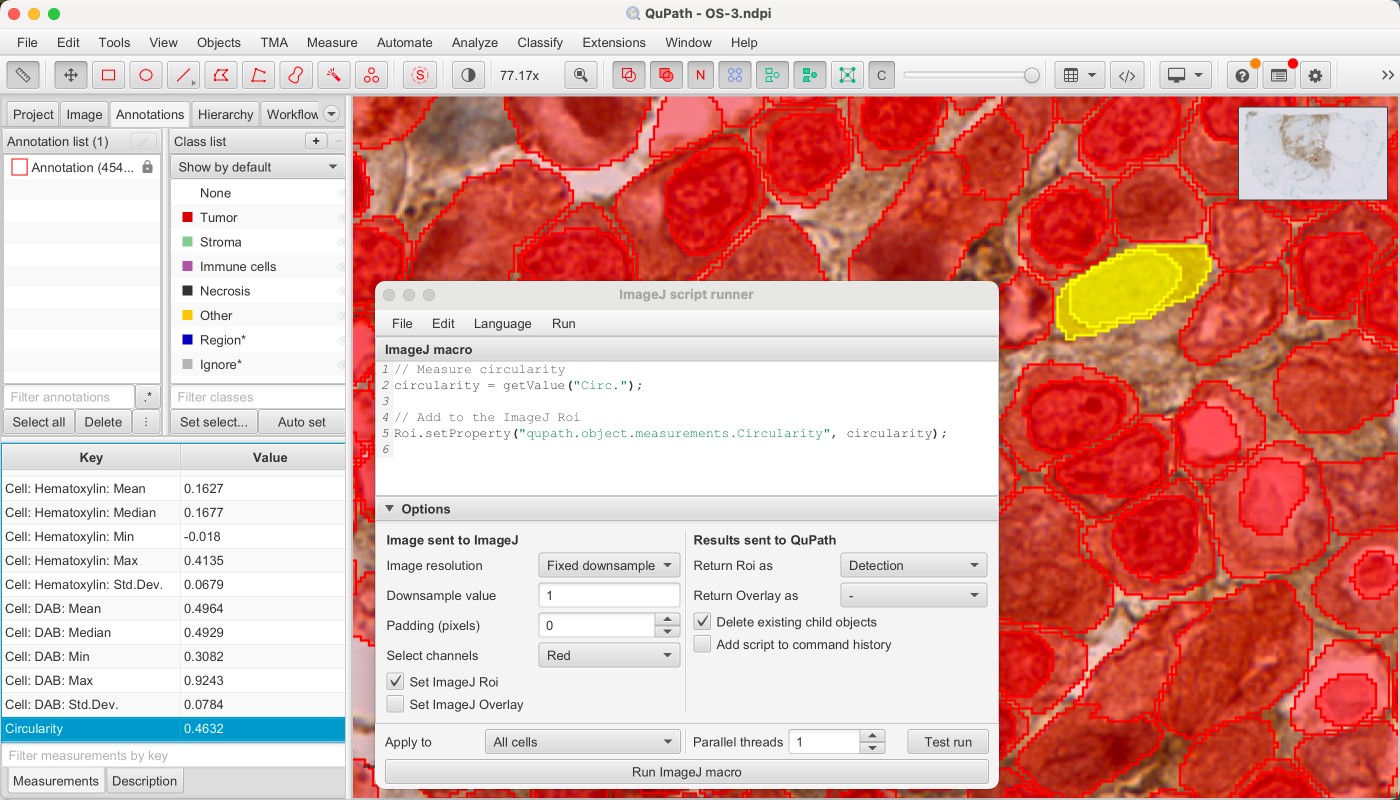
Adding measurements to cells
What’s more, the script runner isn’t limited to the ImageJ macro language. It can also run Groovy scripts written to work with ImageJ data structures.
Here is a much more involved Groovy script that runs through the ImageJ script runner. It can be used to calculate membrane measurements, for all channels that are sent.
import ij.IJ
import ij.process.ByteProcessor
import ij.process.ImageProcessor
import ij.process.ImageStatistics
import qupath.imagej.processing.IJProcessing
import qupath.lib.objects.PathObject

// Define the membrane thickness
int thickness = 3

// Access the image and original QuPath object
var imp = IJ.getImage()
var roi = imp.getRoi()
PathObject pathObject = imp.getProperty("qupath.pathObject")

// Create a Roi for the membrane
var bp = new ByteProcessor(imp.getWidth(), imp.getHeight())
bp.setValue(255)
bp.setLineWidth(thickness)
bp.draw(roi)
bp.setThreshold(127, Double.MAX_VALUE, ImageProcessor.NO_LUT_UPDATE)
var roiMembrane = IJProcessing.thresholdToRoi(bp)
imp.setRoi(roiMembrane)

// Loop through the channels
for (int c = 1; c <= imp.getNChannels(); c++) {
    imp.setPositionWithoutUpdate(c, imp.getSlice(), imp.getFrame())
    var label = imp.getStack().getSliceLabel(imp.getCurrentSlice())
    var name = label ? "Membrane - $label" : "Membrane - Channel $c"
    // Get the mean value - other metrics could be calculated here
    var stats = imp.getStatistics(ImageStatistics.MEAN)
    pathObject.measurements[name] = stats.mean
}

// Reset the original Roi (to avoid returning the new one)
// Comment out this line for a test run to see the membrane Roi
imp.setRoi(roi)
This means that you only need to write the ImageJ processing code for one cell, and the script runner can take care of cropping out all the cells and sending them for processing.
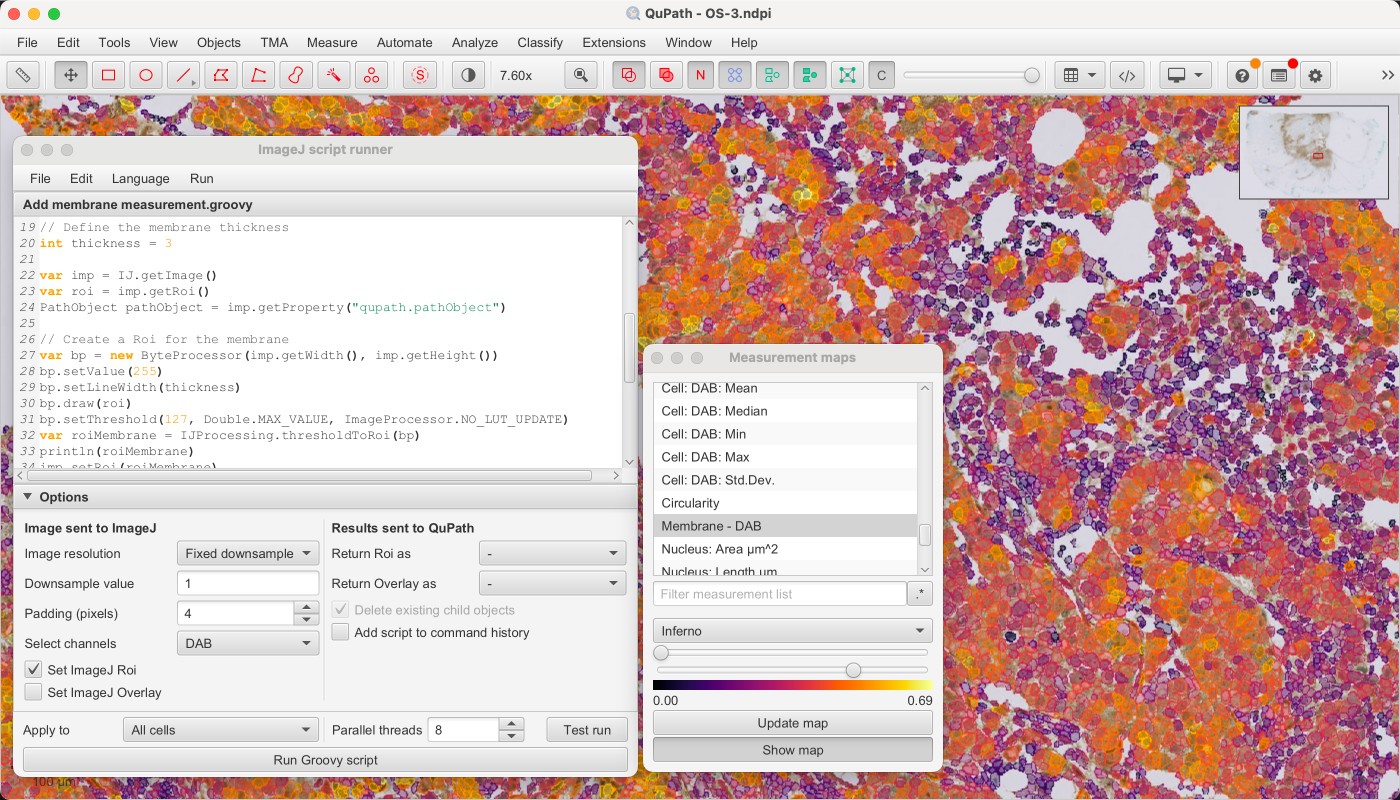
Calculating cell membrane measurements
The images sent to ImageJ are also padded slightly, so that they extend beyond the ROI. This is needed because the membrane is thicker than 1 pixel here.
Groovy scripts tend to be faster than ImageJ macros, and can also be run in parallel. In the screenshot above, 8 threads are used to make the calculations fast – despite having to do quite a lot of work.
There are more examples of such scripts and macros in the script runner, under .
The old ImageJ macro runner
Before v0.6.0, QuPath contained a completely different ImageJ macro runner. It’s likely to be removed in the future, especially if all its functionality becomes available in the script runner.
For now, it can still be found under .