StarDist
StarDist is a fantastic, deep-learning-based method of 2D and 3D nucleus detection from Martin Weigert and Uwe Schmidt. It exists as a Python library and Fiji plugin.
This page describes how to start using StarDist 2D directly within QuPath as an alternative method of cell detection.
Cite the paper!
If you use StarDist in a publication, be sure to cite it:
Uwe Schmidt, Martin Weigert, Coleman Broaddus, and Gene Myers. Cell Detection with Star-convex Polygons. International Conference on Medical Image Computing and Computer-Assisted Intervention (MICCAI), Granada, Spain, September 2018.
(And if you use it in combination with QuPath, be sure to cite the QuPath paper too!)
Getting the StarDist extension
To use StarDist with QuPath, you’ll need to add an extension. You can find it with installation instructions at http://github.com/qupath/qupath-extension-stardist
Getting pretrained models
StarDist is powered by a deep learning model that is trained to detect specific kinds of nuclei. Different models can be trained to detect nuclei within different kinds of image.
You can download three example models originally trained by StarDist’s authors from https://github.com/qupath/models/tree/main/stardist
The two we will consider here are:
dsb2018_heavy_augment.pb - for fluorescence images (one detection channel)
he_heavy_augment.pb - for brightfield H&E (three detection channels, RGB)
Other model formats
The models in the link above should work without installing anything extra in QuPath. They run using OpenCV, which is already available in QuPath.
StarDist models from other sources (including the Bioimage model zoo) typically require TensorFlow to run. You can add this to QuPath with the help of the QuPath Deep Java Library extension - see Using TensorFlow for more info.
Alternatively, you could check out the Intel OpenVINO community extension for alternative model format.
Tip
See the original StarDist papers and GitHub repos for information about training your own models.
Tip
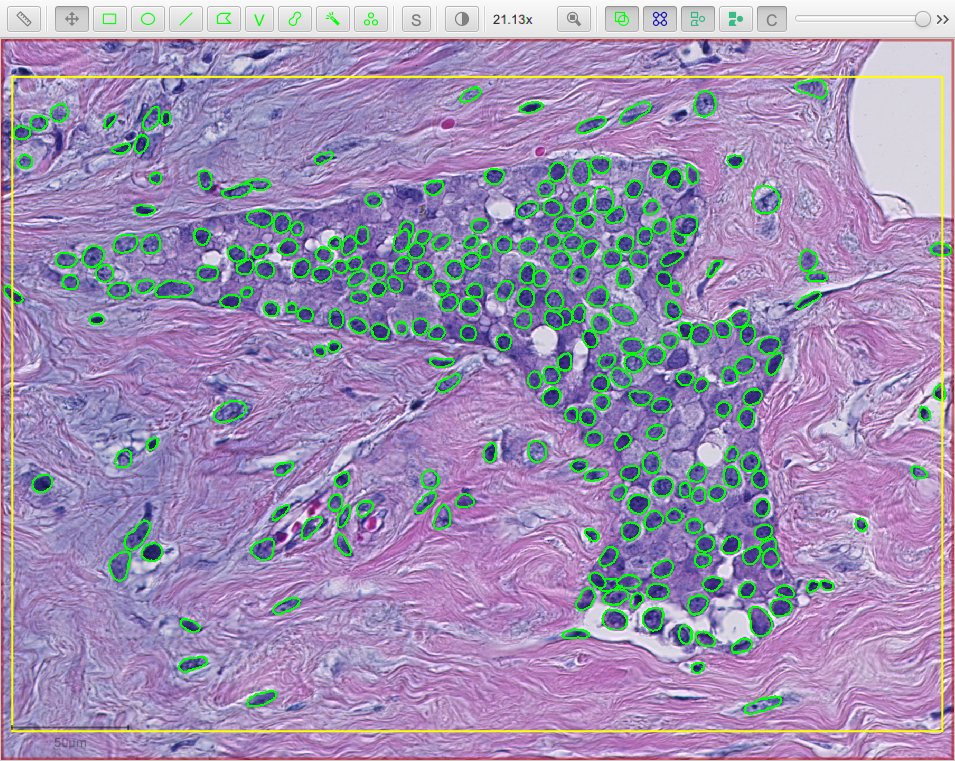
The he_heavy_augment model is capable of more than one might legitimately expect.
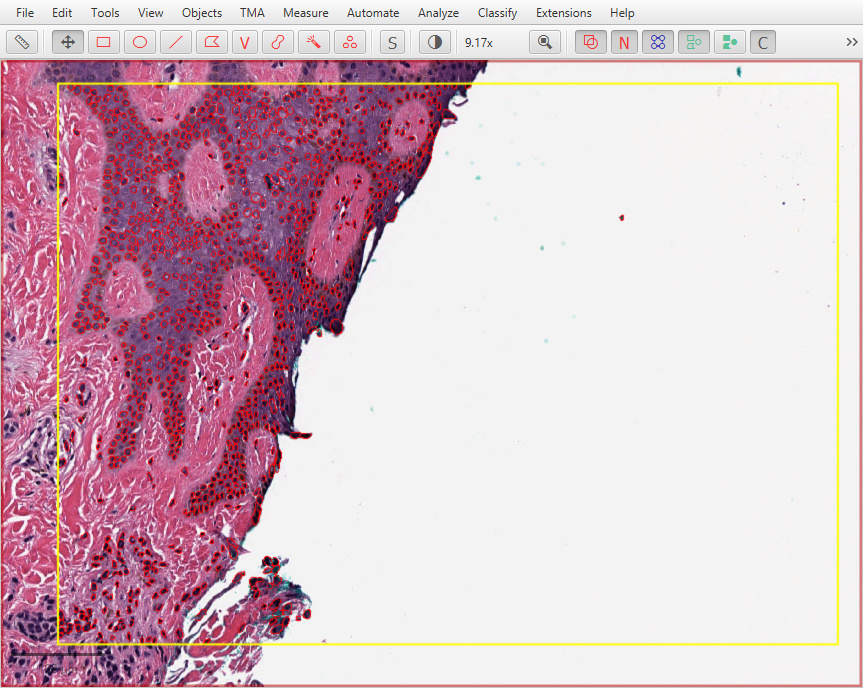
StarDist applied to region of OS-3.ndpi
Detecting nuclei
QuPath’s current early StarDist support is only available by scripting and is rather limited in terms of reporting progress. You can run it and… wait.
Script templates
Although scripts are needed, you don’t need to be a confident scripter to use them. You will generally use a template either from here, or found under .
The only essential modification is usually specify the path to the StarDist model file – but please do read on to see which other options you can change.
The following script applies the he_heavy_augment.pb StarDist model to a brightfield H&E image:
import qupath.ext.stardist.StarDist2D

// Specify the model file (you will need to change this!)
def pathModel = '/path/to/he_heavy_augment.pb'

def stardist = StarDist2D.builder(pathModel)
      .threshold(0.5)              // Prediction threshold
      .normalizePercentiles(1, 99) // Percentile normalization
      .pixelSize(0.5)              // Resolution for detection
      .build()

// Run detection for the selected objects
def imageData = getCurrentImageData()
def pathObjects = getSelectedObjects()
if (pathObjects.isEmpty()) {
    Dialogs.showErrorMessage("StarDist", "Please select a parent object!")
    return
}
stardist.detectObjects(imageData, pathObjects)
println 'Done!'
StarDist applied to region of OS-1.ndpi
Tip
You can copy the model directory outside QuPath (e.g. in Windows Explorer, Mac Finder) and then paste it in the script editor. QuPath will paste in the path to the directory.
If you do this, make sure to add quotation marks around the path!
The following script applies the dsb2018_heavy_augment.pb model to the DAPI channel of a fluorescence image:
import qupath.ext.stardist.StarDist2D

// Specify the model file (you will need to change this!)
def pathModel = '/path/to/dsb2018_heavy_augment.pb'

def stardist = StarDist2D.builder(pathModel)
        .threshold(0.5)              // Probability (detection) threshold
        .channels('DAPI')            // Specify detection channel
        .normalizePercentiles(1, 99) // Percentile normalization
        .pixelSize(0.5)              // Resolution for detection
        .build()

// Run detection for the selected objects
def imageData = getCurrentImageData()
def pathObjects = getSelectedObjects()
if (pathObjects.isEmpty()) {
    Dialogs.showErrorMessage("StarDist", "Please select a parent object!")
    return
}
stardist.detectObjects(imageData, pathObjects)
println 'Done!'
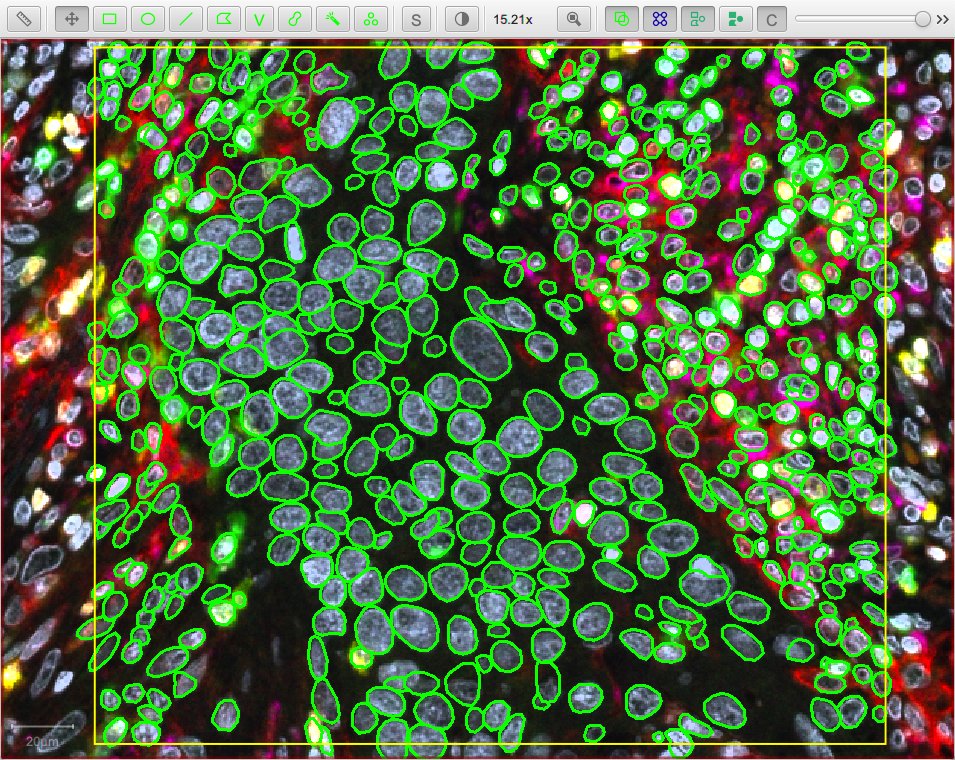
StarDist applied to region of LuCa-7color_[13860,52919]_1x1
Tip
For a fluorescence image with more than one channel, the channel used for detection needs to be specified either using its number (starting from 0) or name.
Customizing detection
The ‘builder’ used in the scripts above introduce many ways to easily customize how the StarDist detection is applied and the final outputs.
One of the most important options is the pixelSize, which is defined in terms of the pixel calibration units for the image (often µm, but sometimes ‘pixels’ if the calibration information is not available).
QuPath will automatically rescale the image as required before input to the model.
The ‘best’ value will depend upon the resolution of the images used to train the StarDist model. You may need to experiment with different values.
Tip
I find that the pretrained models work best at around 0.5 µm/pixel.
Using the Bioimage Model Zoo
You can find some pretrained StarDist models in the Bioimage model zoo.
These can be used in QuPath by providing the path to the (unzipped) model zoo spec file, rather than the StarDist model directly. You may also need to unzip the model weights, which are usually in a file with a name such as
tensorflow_saved_model_bundle.zipTF_SavedModel.ziptf-weights.zip
If you do this, a StarDist2D builder will be initialized using the information from the model spec.
Improving input normalization
One of the most important changes to the StarDist extension in v0.4.0 is adding support to calculate preprocessing normalization based upon the entire image – rather than just for each tile separately. This addressed a problem whereby cells could be detected in areas that only contain background.
For example, the following script normalizes each image tile separately, and has problems in the background:
import qupath.ext.stardist.StarDist2D
def modelPath = "/path/to/he_heavy_augment.pb"

// Customize how the StarDist detection should be applied.
def stardist = StarDist2D
    .builder(modelPath)
    .normalizePercentiles(0.2, 99.8)
    .pixelSize(0.5)              // Resolution for detection
    .build()

// Run detection for the selected objects
def imageData = getCurrentImageData()
def pathObjects = getSelectedObjects()
stardist.detectObjects(imageData, pathObjects)
stardist.close() // This can help clean up & regain memory
println('Done!')
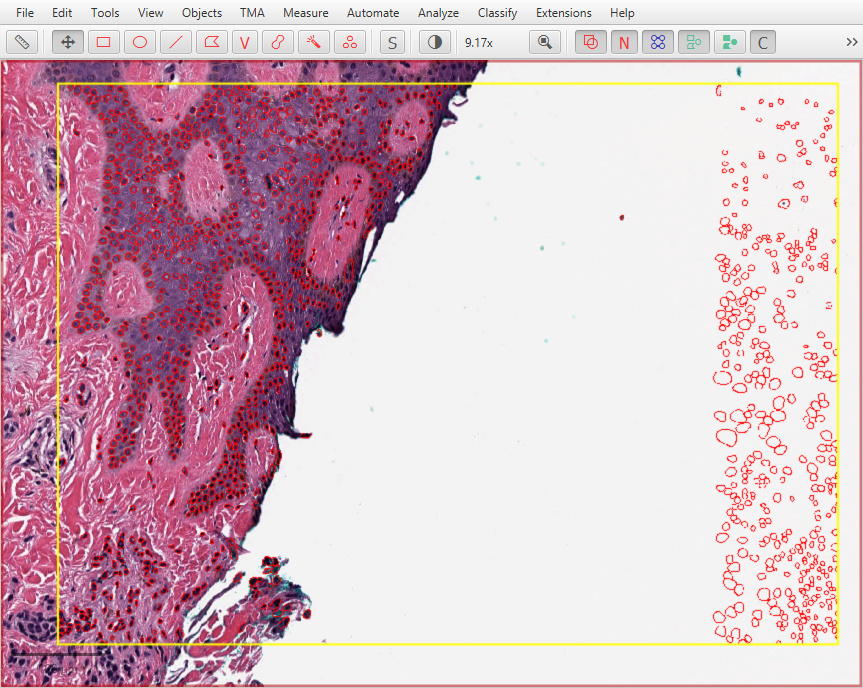
Local percentile normalization can sometimes hallucinate nuclei in the image background
In practice that might be ok if the detection is constrained to the tissue region anyway, but it shows a potential variation that is unwelcome.
By contrast, thie script computes the normalization percentiles across a downsampled version of the whole image, and performs reasonably everywhere in the image:
import qupath.ext.stardist.StarDist2D
def modelPath = "/path/to/he_heavy_augment.pb"

// Customize how the StarDist detection should be applied.
def stardist = StarDist2D
    .builder(modelPath)
    .preprocess(                 // Apply normalization, calculating values across the whole image
        StarDist2D.imageNormalizationBuilder()
            .maxDimension(4096)    // Figure out how much to downsample large images to make sure the width & height are <= this value
            .percentiles(0.2, 99.8)  // Calculate image percentiles to use for normalization
            .build()
	)
    .pixelSize(0.5)              // Resolution for detection
    .build()

// Run detection for the selected objects
def imageData = getCurrentImageData()
def pathObjects = getSelectedObjects()
stardist.detectObjects(imageData, pathObjects)
stardist.close() // This can help clean up & regain memory
println('Done!')
Global percentile normalization can remove false positive detections in the background
Viewing probabilities
Another customization is to include the probability estimates as measurements for each detection.
import qupath.ext.stardist.StarDist2D

// Specify the model file (you will need to change this!)
def pathModel = '/path/to/he_heavy_augment.pb'

def stardist = StarDist2D.builder(pathModel)
        .threshold(0.1)              // Prediction threshold
        .normalizePercentiles(1, 99) // Percentile normalization
        .pixelSize(0.5)              // Resolution for detection
        .includeProbability(true)    // Include prediction probability as measurement
        .build()

// Run detection for the selected objects
def imageData = getCurrentImageData()
def pathObjects = getSelectedObjects()
if (pathObjects.isEmpty()) {
    Dialogs.showErrorMessage("StarDist", "Please select a parent object!")
    return
}
stardist.detectObjects(imageData, pathObjects)
println 'Done!'
These probabilities can then be visualized in QuPath through measurement tables or maps. This can be useful to help choose appropriate threshold values; you could set a much lower detection threshold to ‘over-detect’ (as in the above script) and use the output probabilities to determine an appropriate cutoff threshold for the future.
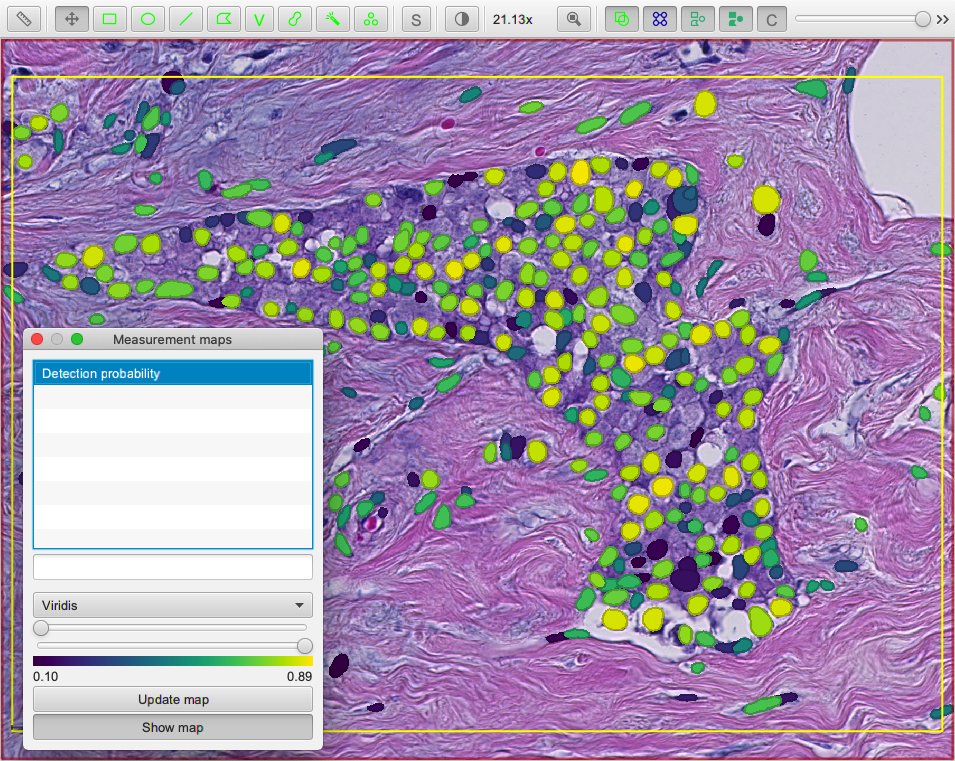
StarDist with probability estimates applied to region of OS-1.ndpi
Tip
In principle, you could always use a low detection threshold and discard false positives later. However, QuPath does need to work quite hard to resolve overlapping detections - and so performance should be substantially improved if you can restrict your initial detections to only cells you will want to keep.
Cell expansion & measurements
QuPath’s built-in cell detection can optionally expand nuclei to approximate the full cell area, and then make measurements of different cell compartments (nucleus, cytoplasm and both).
A similar distance-based expansion can also be used with StarDist, with optional measurements.
import qupath.ext.stardist.StarDist2D

// Specify the model file (you will need to change this!)
def pathModel = '/path/to/dsb2018_heavy_augment.pb'

def stardist = StarDist2D.builder(pathModel)
        .threshold(0.5)              // Probability (detection) threshold
        .channels('DAPI')            // Select detection channel
        .normalizePercentiles(1, 99) // Percentile normalization
        .pixelSize(0.5)              // Resolution for detection
        .cellExpansion(5.0)          // Approximate cells based upon nucleus expansion
        .cellConstrainScale(1.5)     // Constrain cell expansion using nucleus size
        .measureShape()              // Add shape measurements
        .measureIntensity()          // Add cell measurements (in all compartments)
        .includeProbability(true)    // Add probability as a measurement (enables later filtering)
        .build()

// Run detection for the selected objects
def imageData = getCurrentImageData()
def pathObjects = getSelectedObjects()
if (pathObjects.isEmpty()) {
    Dialogs.showErrorMessage("StarDist", "Please select a parent object!")
    return
}
stardist.detectObjects(imageData, pathObjects)
println 'Done!'
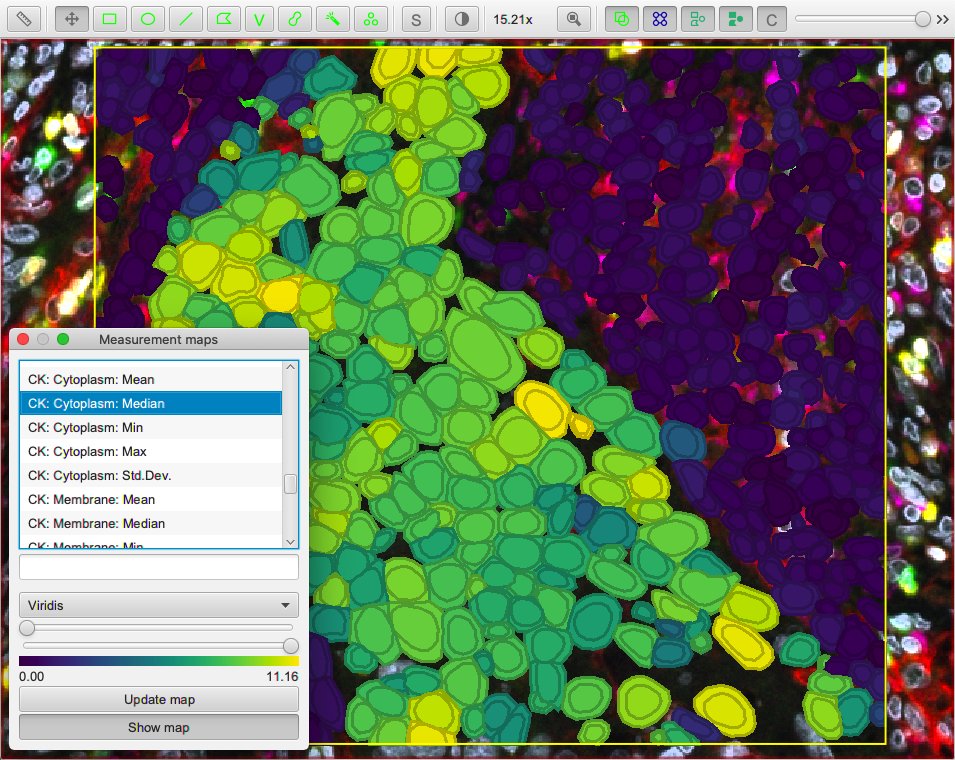
StarDist + QuPath cell detection and measurement
StarDist stops after nuclei have been detected; everything after that is specific to QuPath.
Nevertheless, the script above provides access to some additional features not (currently) available in QuPath’s default cell detection. These include:
Slightly different (improved!) measurements
Measurements also made in the predicted ‘membrane’
Extra cell expansion constraint; in addition to distance, the nucleus can be constrained so that it does not grow to more than a multiple of the nucleus size
Warning
The cell expansion currently uses an elaborate, geometry-based method – rather than the pixel-based approach in the built-in cell detection command.
This gives much smoother results independent of image resolution, but it can produce artifacts in some (hopefully rare) cases.
These artifacts are not present if StarDist is used without cell expansion.
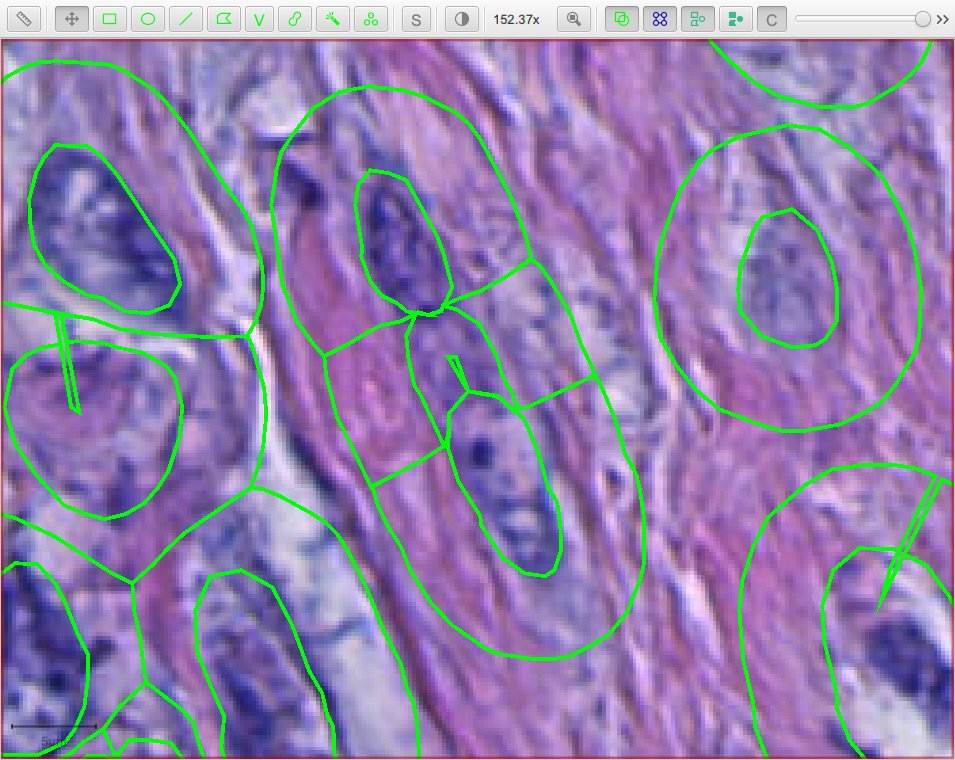
Artifacts to look out when using geometry-based cell expansion
More detection options
There are even more options available than those described above. Here is an example showing most of them:
def stardist = StarDist2D.builder(pathModel)
        .threshold(0.5)              // Probability (detection) threshold
        .channels('DAPI')            // Select detection channel
        .normalizePercentiles(1, 99) // Percentile normalization
        .pixelSize(0.5)              // Resolution for detection
        .tileSize(1024)              // Specify width & height of the tile used for prediction
        .cellExpansion(5.0)          // Approximate cells based upon nucleus expansion
        .cellConstrainScale(1.5)     // Constrain cell expansion using nucleus size
        .ignoreCellOverlaps(false)   // Set to true if you don't care if cells expand into one another
        .measureShape()              // Add shape measurements
        .measureIntensity()          // Add cell measurements (in all compartments)
        .includeProbability(true)    // Add probability as a measurement (enables later filtering)
        .nThreads(4)                 // Limit the number of threads used for (possibly parallel) processing
        .simplify(1)                 // Control how polygons are 'simplified' to remove unnecessary vertices
        .doLog()                     // Use this to log a bit more information while running the script
        .createAnnotations()         // Generate annotation objects using StarDist, rather than detection objects
        .constrainToParent(false)    // Prevent nuclei/cells expanding beyond any parent annotations (default is true)
        .classify("Tumor")           // Automatically assign all created objects as 'Tumor'
        .build()
Tip
In the event that you want to measure ‘a ring around the nucleus’ and avoid all the computational kerfuffle involved in preventing overlaps, use ignoreCellOverlaps(true).
Advanced options
Include preprocessing
One of the most useful extra options to the builder is preprocessing, which makes it possible to perform some additional pixel operations before StarDist is used.
For example, rather than normalizing each image tile individually (as normalizePercentiles will do), we can normalize pixels using fixed values, for example with
def stardist = StarDist2D.builder(pathModel)
      .threshold(0.5)     // Prediction threshold
      .preprocess(        // Extra preprocessing steps, applied sequentially
              ImageOps.Core.subtract(100),
              ImageOps.Core.divide(100)
      )
//      .normalizePercentiles(1, 99) // Percentile normalization (turned off here)
      .pixelSize(0.5)                // Resolution for detection
      .includeProbability(true)      // Include prediction probability as measurement
      .build()
Furthermore, we can use preprocessing to convert images to become more compatible with pretrained StarDist models.
For example, dsb2018_heavy_augment.pb works very well for fluorescence microscopy images, but only supports a single input channel.
However, by applying color deconvolution as preprocessing we can convert a 3-channel brightfield image to a single-channel image that looks much more like a fluorescence image.
If needed, we can add extra things like filters to reduce noise as well.
// Get current image - assumed to have color deconvolution stains set
def imageData = getCurrentImageData()
def stains = imageData.getColorDeconvolutionStains()

// Set everything up with single-channel fluorescence model
def pathModel = '/path/to/dsb2018_heavy_augment.pb'

def stardist = StarDist2D.builder(pathModel)
        .preprocess( // Extra preprocessing steps, applied sequentially
            ImageOps.Channels.deconvolve(stains),
            ImageOps.Channels.extract(0),
            ImageOps.Filters.median(2),
            ImageOps.Core.divide(1.5)
         )
        .pixelSize(0.5)
        .includeProbability(true)
        .threshold(0.5)
        .build()
Tip
These tricks were first described in this forum post.
Include classification
StarDist can do more than simply detect nuclei: it can classify them as well. There is an example notebook here that describes how to train a model capable of both detection and classification.
The QuPath StarDist extension can use these models as well. It only requires a change to input a map linking StarDist prediction labels to QuPath classifications.
// Define model and resolution
def pathModel = "/path/to/classification/model.pb"
double pixelSize = 0.5

// Define a classification map, connecting prediction labels and classification names
def classifications = [
    0: 'Background',
    1: 'Stroma',
    2: 'Tumor'
]

def stardist = StarDist2D.builder(pathModel)
        .threshold(0.5)
        .simplify(0)
        .classificationNames(classifications) // Include names so that classifications can be applied
        .keepClassifiedBackground(false)      // Optionally keep detections that are classified as background (default is false)
        .normalizePercentiles(1, 99)
        .pixelSize(pixelSize)
        .build()

// Run detection for the selected objects
def imageData = getCurrentImageData()
def pathObjects = getSelectedObjects()
if (pathObjects.isEmpty()) {
    Dialogs.showErrorMessage("StarDist", "Please select a parent object!")
    return
}
stardist.detectObjects(imageData, pathObjects)
println 'Done!'
Tip
QuPath will attempt to untangle where the classifications are in the outputs of the model. For this to work, the number of rays predicted by StarDist should be greater than the number of distinct classifications.
Use TensorFlow
If you want to use TensorFlow, you can install the QuPath Deep Java Library extension.
Your pretrained models will then need to be in TensorFlow’s SavedModel format. Unzipped examples from the stardist-imagej repository should work.
You will also need to give QuPath the path to the folder containing the model files in this case, e.g.
def pathModel = '/path/to/dsb2018_heavy_augment' // A folder, not a file
Troubleshooting
One error you might see when trying to do this is:
ai.djl.engine.EngineException: Failed to load TensorFlow native library
If so, check out the Deep Java Library instructions, and make sure that you have downloaded the TensorFlow framework via .
What about the TensorFlow extension?
In QuPath v0.3, you could add TensorFlow support via the QuPath TensorFlow Extension. This has been replaced by the Deep Java Library extension.
Use CUDA
If you have a recent NVIDIA graphics card, you might benefit from running StarDist using CUDA.
The best way to do this is to use TensorFlow via Deep Java Library, as described above. However note that TensorFlow dropped CUDA support for Windows, so this can only work with Linux.
Differences from StarDist Fiji
While inspired by the Fiji plugin, the QuPath implementation does not use any of the same code - and the method has been adapted and augmented in several ways to be more QuPath-friendly. These include:
More customization options (e.g. specifying resolution, input channels)
Cell boundary estimation by expansion
Adding measurements (including prediction probabilities)
Another difference is in how overlapping nuclei are handled. The Fiji plugin allows overlaps, controlled with an overlap threshold parameter.
QuPath does not permit overlapping nuclei. Rather, it handles overlaps by retaining the nucleus with the highest prediction probability unchanged, and removing overlapping areas from lower-probability detections - discarding these detections only if their area decreases by more than 50%.