WSInfer
The WSInfer QuPath extension makes it possible to do patch-based deep learning inference for digital pathology, without any need for scripting.
It’s a collaboration between Stony Brook University (WSInfer) and the QuPath group (the extension that brings WSInfer models to QuPath).
Cite the paper!
If you use WSInfer and/or this extension in a publication, please make sure to cite our paper.
Kaczmarzyk, J.R., O’Callaghan, A., Inglis, F. et al. Open and reusable deep learning for pathology with WSInfer and QuPath. npj Precis. Onc. 8, 9 (2024). https://doi.org/10.1038/s41698-024-00499-9
(And if you use it in combination with QuPath, be sure to cite the QuPath paper too!)
Requirements
QuPath v0.6 or later (installation instructions).
At least one whole slide image
PyTorch (this can be downloaded while using the extension)
Tip
A GPU is not required but can dramatically speed up processing. If you have an NVIDIA GPU and want to use it with WSInfer, you will need to install a version of CUDA compatible with PyTorch - please see GPU support.
Set-up
With QuPath installed and running, use the extension manager to install the WSInfer extension from the QuPath catalog. Once installed, open up an image and run the extension via . You should see the window below:
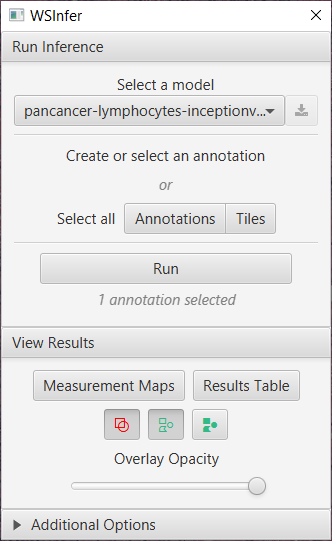
The WSInfer user interface
Note
Please note that you’ll need internet access to start the extension and download the models.
Whole Slide Inference
1. Select a model
Select the a model from the dropdown menu and click the download icon button to start the download. You should see a notification when the download is complete.
2. Create or select an annotation
Create an annotation or select a pre-existing annotations/tiles you wish to run the model on. It’s recommended that if this is the first time running WSInfer to keep the annotation smaller to test the processing speed before running it on a larger region. This might take some time, depending on your computers processing speed.
Select tiles or annotations?
WSInfer assign classifications to tile objects.
Most of the time, you should draw/select annotations on the image before running WSInfer. The WSInfer extension will then create the tiles that it needs.
The size of the tiles created automatically will match the size of the patch WSInfer is using to for inference. That’s why the tile sizes generated for different models can be different: it depends what size of patch was used to train the model.
Sometimes you might want to reuse existing tiles, and append the measurements made by WSInfer to them. This is especially useful if you want to run WSInfer multiple times using different models. This is why there is also an option to select tiles, as an alternative to selecting annotations.
When you do that, WSInfer won’t create new tiles - but it will still use patches based on the resolution and patch size used to train the model. These patches don’t necessarily have to correspond exactly to the tiles shown in QuPath - they might be bigger or smaller - but they should still be centered on the same pixels.
3. Run
Check you have an annotation selected and click run and if all the requirements are present then the processing will begin. If you don’t have PyTorch yet, you will be prompted to download it (this may well be > 100 MB, so may take a while).
4. View Results
Once the progress bar is complete the results can be visualized using the tools in the View Results section.
The Measurement Maps tool presents the score of each tile by color and can be interacted with using the 3 toggle buttons to either show, hide or fill the annotations and detections.
The slider can be used to increase or decrease the fill opacity so the tissue features can be seen under the WSInfer scores.
The Results Table provides details for each tile and the option to export for further analysis.
Additional Options
You can also use the additional options to specify where models should be stored, and also the number of parallel threads used to read patches from the image (usually 1 or 2).
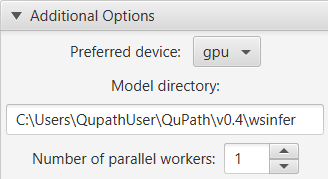
WSInfer’s additional options
However the most (potentially) exciting additional option is the Preferred device: the one that promises to (maybe) make things run much faster.
The options available will depend upon your computer’s capabilities (at least as far as they could be discerned by Deep Java Library):
CPU: This is generally the safest - and slowest - option, because it should be supported on all computers.
MPS: This stands for Metal Performance Shaders, and should be available on recent Apple silicon - it is the Mac version of GPU acceleration
GPU: This should appear if you have an NVIDIA GPU, CUDA… and a little bit of luck.
If either MPS or GPU work for you, they should reduce the time required for inference by a lot. However configuration for GPU can be tricky, as it will depend upon other hardware and software on your computer - CUDA in particular. For more info, see GPU support.
PyTorch & CUDA versions
The WSInfer extension is using Deep Java Library to manage its PyTorch installation. It won’t automatically find any existing PyTorch you might have installed: Deep Java Library will download its own.
If you have a compatible GPU, and want CUDA support, you’ll need to ensure you have an appropriate CUDA installed before PyTorch is downloaded.
Using your own models
In addition to models downloaded from the WSInfer zoo, you may also use your own models by putting them in a specific local directory called user or local.
This in turn should be put into the model directory (the path can be seen in the WSI dialog) as a sibling of the kaczmarj directory that contains the downloaded models.
Inside the local models directory, every model should be contained in a subdirectory. The subdirectory name becomes the model name in the model selection menu. Inside it, there will be:
the model in Torchscript format, with the name
torchscript_model.pt, anda
config.jsonfile, as explained here. An example of config file is shown here.
Thus, the structure of the models directory could be as follows:
wsinfer
  kaczmarj
    breast-tumor-resnet34.tcga-brca
      main
        README.md
        config.json
        lfs-pointer.txt
        torchscript_model.pt
  local
    my_model
      config.json
      torchscript_model.pt
  wsinfer-zoo-registry.json
Scripting
The QuPath WSInfer extension is scriptable, which makes it much easier to apply across multiple images.
When a model is run, the command parameters are stored in the workflow so that a [script can be generated automatically](docs/scripting/workflows_to_scripts:Workflows to scripts).
An example script would be
selectAnnotations()
qupath.ext.wsinfer.WSInfer.runInference("kaczmarj/pancancer-lymphocytes-inceptionv4.tcga")
where the selectAnnotation() line was added when I pressed the Annotations button in the WSInfer dialog, and the following line runs the specified model (creating tiles automatically).
To process in batch, I would need to
Add my images to a QuPath project
Annotate the regions of interest in the images (and save the data)
Open the above script in QuPath’s script editor
Choose , and select the images I want to process
Identifying TILs (overlaying predictions of two models)
By combining multiple WSInfer models, it’s possible to develop more complex end-to-end workflows in QuPath. This is easiest to achieve using scripting.
The script below aims to identify regions containing tumor-infiltrating lymphocytes (TILs). It does this by applying a lymphocyte patch classification model and then a breast tumor classification model on the same patches.
After running the script, you can export results or markup images.